After training, next step is to deploy model for use in production. There are different ways to do it, Docker is one of them. Docker is widely used for deployment of almost any application.
For this demo intance we are using a pretrained resnet classification model trained on imagenet.
Classification Model Setup
We first load model using keras api. We next download and test a ResNet-50 pre-trained model from the Keras model zoo.Then we need to create a function that accepts an image, preprocess that image and predicts using model we loaded at start.
Load Model
We first load model using keras api. It will check directory, if model already exists, it will load that model otherwise it will fetch from models repo and will require internet connection.
from tensorflow.keras.applications.resnet50 import ResNet50
model = ResNet50(weights='imagenet')
Now after we have loaded model, we write a function that accepts an image and returns class of image. It includes a number of steps for pre and post processing. First we read image using pillow and resize it to desired size which is 224x224 in our case. Next step is to convert to a numpy array and expand dims to meet expected input to model. Then we pass imae to model for prediction.
Model returns classification score for each class. Next step is to process that info and get a class with maximum score. We use keras decode_predictions function for this, which loads labels for model and get top N number of predictions. We are just getting top one prediction, but you can modify this in function.
from PIL import Image
import numpy as np
# Used for decoding predictions
from tensorflow.keras.applications.resnet50 import decode_predictions

def predict(image_path, IMG_SIZE=224):
    image = Image.open(image_path)
    # resize image to target size
    image = image.resize((IMG_SIZE, IMG_SIZE))
    image = np.asarray(image)
    image = np.expand_dims(image, axis=0)

    # Predict image using model
    resp = model.predict(image)
    # Get top predicted class label
    return decode_predictions(resp, top=1)[0][0]
Now we create a flask app that accepts an image and generate predictions for that image using function created above. We first import required modules and initialize app. Werkzeug is a flask dependency can be used to get a secure filename for a given file. We use it to avoid creating files with undesired filenames for security.
Create Flask App
Flask app can be easily created using flask name and we can create it as follows.
# Import modules from flask and werkzeug libraries
from flask import Flask, request, jsonify
from werkzeug.utils import secure_filename

app = Flask(__name__) # create a flask app
Next part is to create a route. We first create a index route which is a get request and respond just a string. We are creating this to test and check if app is working. You can ignore it if you want.
@app.route('/')
def index():
    return "App is Working"
Now we create /predict route for actual prediction of image. It is a post request which will accept an image, process it and return its label and accuracy. We first get an image using request.files which returns a file and in second step, we get secure filename for that image. Then we save it in our directory. After that we send image to predict function which process image and return its label.
@app.route('/predict', methods=['POST'])
def predict_request():
    # Get file and save it
    file = request.files['image']
    filename = secure_filename(file.filename)
    file.save(filename)
    # Send prediction request
    resp = predict(filename)
    return jsonify({
        "class" : resp[1],
        "accuracy" : resp[2]
    })
Now as last step we can run our app using app.run() method. Values passed to this method are optional. We use this method to run our app for testin and is not recommended for production. For production, we will see steps in docker.
if __name__ == '__main__':
    app.run(host='0.0.0.0', port=80, debug=True)
To run application open terminal/cmd and type this command to run
$ python main.pyGet to http://localhost and you can view our index route message. You can send post request from any scripting language like python, php, java etc. Also you can use postman to send request to url.
Now we need to dockerize our flask application so that we can deploy it on any cloud service.
Docker Setup
To create docker image, we need docker on our system. It just takes some steps to download an install docker on any Major OS. Here are instructions to install docker on ubuntu and Windows.
How to install
Windows
For Windows, Docker has a pretty simple installer. Which is a GUI and just requires some clicks to install docker on your machine. It can be downloaded from Docker's official site.
https://hub.docker.com/editions/community/docker-ce-desktop-windows
Ubuntu
For ubuntu, it requires come commands for right version of your Ubuntu.
For Ubuntu 16.04.
https://www.digitalocean.com/community/tutorials/how-to-install-and-use-docker-on-ubuntu-16-04
For Ubuntu 18.04
https://www.digitalocean.com/community/tutorials/how-to-install-and-use-docker-on-ubuntu-18-04
Dockerfile
We create a dockerfile for docker deployment where we define all our requirements for application for both python and system. To define our python libraries requirements we can create a requirements.txt file in our root directory. For example as follows.
flask==1.1.2
pillow==8.0.1
tensorflow==2.3.1
gunicorn==20.0.4
Create another file named Dockerfile without any extension.
FROM python:3.8-slim

# Install production dependencies.
ADD requirements.txt ./requirements.txt
RUN pip install -r requirements.txt

# Copy local code to the container image.
WORKDIR /app
COPY . .

ENV PORT 80
CMD exec gunicorn --bind 0.0.0.0:$PORT --workers 1 --threads 4 --timeout 0 main:app
Now we need to build our dockerfile using docker. First make sure docker is installed on your system and is running. After installation open terminal/cmd in current working directory to build image.
docker build -t flask-classifier .Here docker build is docker command, and -t is flag for docker image name which we defined as flask-classifier. Now as we have dockerfile in current path so we define . as dockerfile path. You can change image name to any valid string. Image creation takes a little time depending on instructions and internet speed. When this is docker, you can run it using this command.
docker run -p 80:80 --name imgclassifier flask-classifierHere with -p flag we can access port 8080 in docker container in our system. Now you can get to http://localhost:80 to check if app is running. If your app is running, you can send a POST request using any programming language or can use GUI tools such as POSTMAN to send an image and get results.
Deploy on Azure
Azure cloud offers Azure Container Instancefor deployment of docker cotainers and also offers different GPUs for better performance. We will be using azure container instance to deploy our container to cloud. But first we need a image registery to store our image that then can be used for deployment. There are two major options available for getting started.
- Docker Hub
- Azure Container Registery
Docker Hub
Docker Hub is an easy and free source for storing your docker images. You can also connect to github for continuous deployment. For using Docker hub, you need to create an account which will store docker images and that then can be used. Create an account by using this url for docker hub.
Once you have created an account, you need to tag image with you username on docker like username/image-name. In our case it could be username/flask-classifier. To tag image, you can use this command. You will need to replace username with your username.
docker tag flask-classifier username/flask-classifierNow you can push image to docker hub.
docker push username/flask-classifierAzure Container Registery
Azure also offers container registery for storing docker images in private. You can create a container registery on azure and use it for storing you docker image and deploy. Once you have an azure account setup, you can create a container registery on azure. Open Azure Portal and search for container registeries.
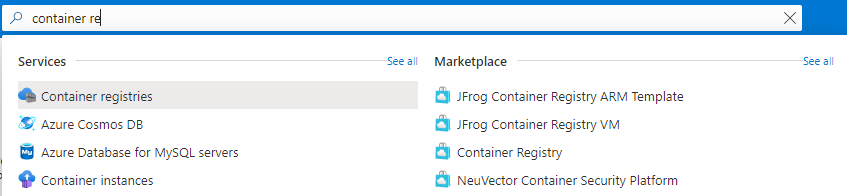
On page, click on new to create an azure container registry.
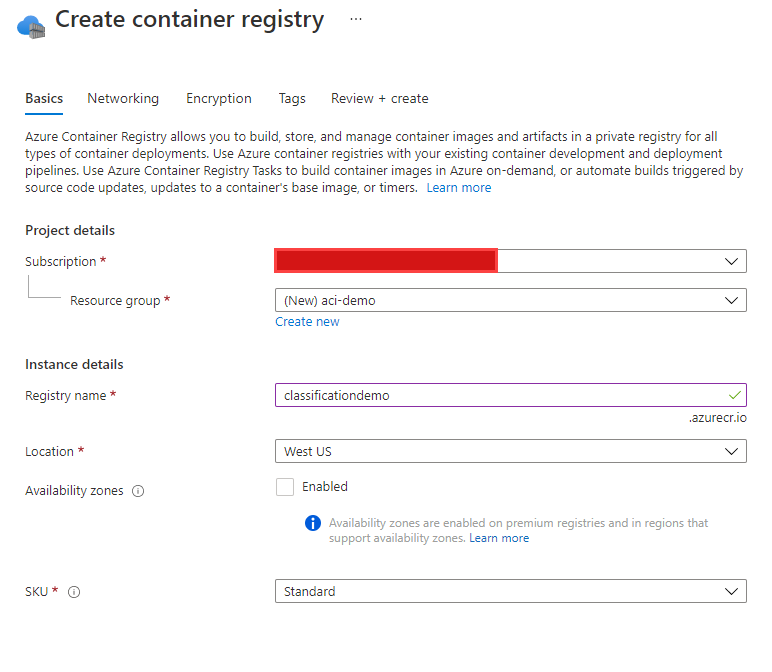
Once, you have ACR setup, you can use it to push your docker image to your acr, but first you need to change tag to your ACR login server. You can get login server from your ACR instance overview. In this case, it will be classificationdemo.azurecr.io. You can get yours from your resource. Click on overview to view your details.

To use Azure Cli, Download and install azure cli from microsoft webpage and install on your OS.
https://docs.microsoft.com/en-us/cli/azure/install-azure-cli
You will need to login to your azure account by typing az login in command prompt and then login to azure container instance using az acr login --name classificationdemo. Now tag your image using same method as used in previous steps and push to azure.
docker tag flask-classifier classificationdemo.azurecr.io/flask-classifier

#push to azure acr
docker push classificationdemo.azurecr.io/flask-classifier
Now we need to deploy this image to cloud services. For azure we can either deploy on Azure App Services or Azure Container Instances.
Deploy on ACI
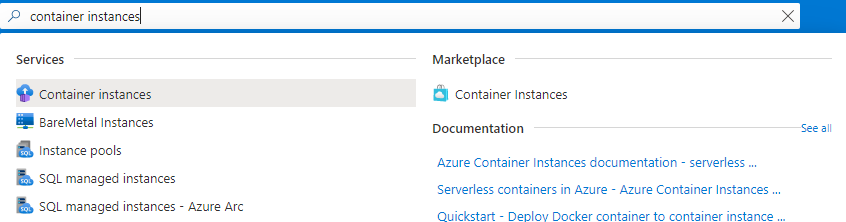
To deploy it using GUI, open your portal in browser https://portal.azure.com. And search for azure container instances.
Click on create container instance to create an instance. In container instance creation form you can choose name, image source, size(vcpu, memory and gpus). You can modify it according to your model requirements. For GPU docker instance, you need to change tensorflow cpu to gpu and setup cuda and cudnn. For that you can use official tensorflow GPU image, of NVIDIA docker image for using GPU.
- If you are using docker hub for storing image, you can choose
Docker Hub or other registry. - If you are using Azure container registery, you can choose that option.
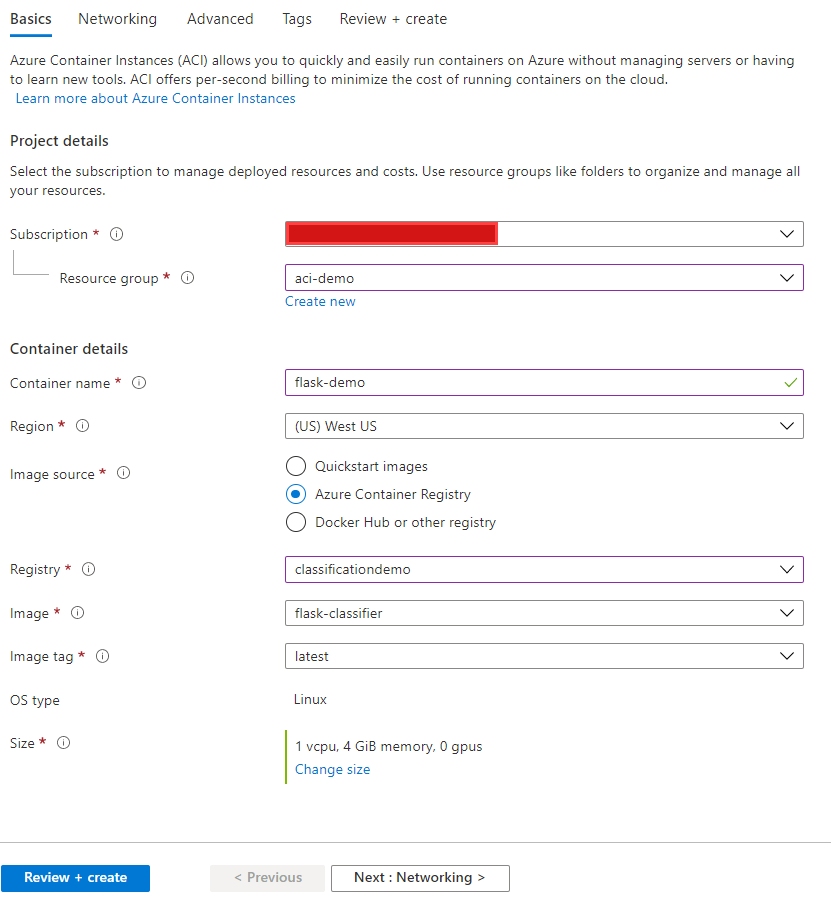
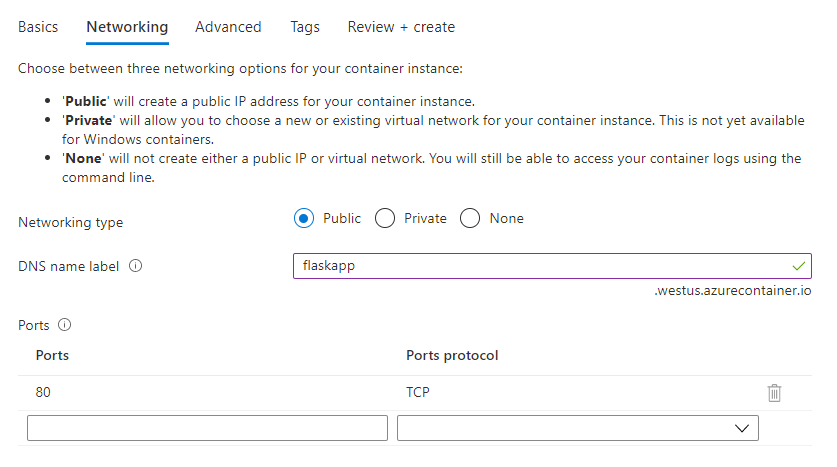
Here, you can name your container instance, choose region, image source and size of your vm. Then click on networking to setup those details. In networking tab, you can provide a DNS name which later on can be used for accessing container instance instead of Public IP. You can also choose networking type to public or private. If your container has only flask app deployed using docker file above and it is using port 80, then you are good to go, otherwise ofcource you can add another port.
After these changes, click on create and submit for deployment. It will take some minutes for deployment depending on size of image and size of your container instance.
After deployment, you can go to your resource and can view its details. Basic details like status, Public DNS and IP address are visible in overview tab. You can access your container instance by your DNS or public IP address and can send requests to that specific address.

Now as it is deployed and is available for requests, you can view logs in logs section and can restart if required. At the end don't forget to delete these resources to avoid further cost, if you are using for learning only. For GPU instances, you just need to change docker base image to tensorflow/tensorflow:2.3.2-gpu and remove tensorflow from requirements file.