Face Detection and Recognition is a very used part in Deep Learning. We use face detection and recognition for different tasks like login on applications, person recognition and different attendence systems.
As Deep learning requires a lot of dataset for training a model, so we can use pretrained models for such type of tasks. This module is built using dlib's state-of-the-art face recognition built with deep learning. The model has an accuracy of 99.38% on the Labeled Faces in the Wild benchmark.
Face_Recognition module is built by Ageitgey and can be found on Github. It is also available on Python Package Manager and could be installed using PIP as follows.
We will also need pillow to show and draw on images. So we need to install it also.
pip install face-recognition pillowWe will discuss some of its usage. You can find all code examples at Github Page.
Face Detection
Face detection using this module is pretty simple. First import basic modules required.
# First import necessary packages to read image files and also face_recognition module for detection
from PIL import Image
import face_recognition
Now we will read image file and detect faces. We can read an image and pass to face recognition module or can read by image path.
# Load the image file into a numpy array
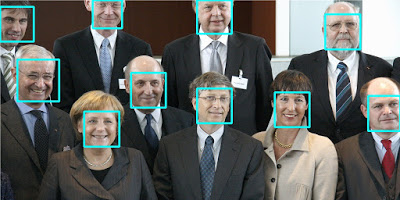
image = face_recognition.load_image_file("bill_gates.jpg")
# Find all the faces in the image using the default HOG-based model.
face_locations = face_recognition.face_locations(image)
print("Found {} faces in this photograph.".format(len(face_locations)))It returns a list of face locations detected in image. Now we can either extract those faces or draw rectangles using those points.
Using PIL
PIL module is used for image read, draw and other image processing requirements and is a light module.
1. Draw Bounding Boxes
pil_image = Image.fromarray(image)
# Now we will extract bounding box points for all detected faces in image
for face_location in face_locations:
    # Print the location of each face in this image
    top, right, bottom, left = face_location

    # Draw a rectangle using ImageDraw function on image
    shape = [(left, top), (right, bottom)]
    img1 = ImageDraw.Draw(pil_image)

    # We set outline color as red and width of 4
    img1.rectangle(shape, outline ="red", width=4)
# Show final image
pil_image.show()
# Save image
pil_image.save("output.jpg")
2. Extract and Save all Faces
In this part, we will iterate over all detections and will save outputs to storage. We are assigning numbers for zero to total detection. You can change path and name according to your choice.
# Now we will extract faces for all detected faces in image
for i, face_location in enumerate(face_locations):
    # Print the location of each face in this image
    top, right, bottom, left = face_location

    # We can extract face using these 4 points
    face_image = image[top:bottom, left:right]
    pil_image = Image.fromarray(face_image)

    # Show extracted face
    pil_image.show()

    # Save to path
    pil_image.save(f"face-{i}.png")
Code for this example is also available on this url.
Using OpenCV
OpenCV is widely used for computer vision tasks and has a lot of features. By using opencv, we can get output in less code. OpenCV can be installed easily on windows using PIP. On ubuntu it requires some additional steps. We can install latest version of OpenCV by using PiP
pip install opencv-pythonDraw Bounding Boxes
We will draw boxes around faces from detection using opencv module. OpenCV read images in BGR format, so we need to convert out images
# Now first we will convert image array from BGR to RGB
image = cv2.cvtColor(image, cv2.COLOR_BGR2RGB)
for face_location in face_locations:
    # Print the location of each face in this image
    top, right, bottom, left = face_location

    # We can draw rectangle using OpenCV rectangle method
    cv2.rectangle(image, (left, top), (right, bottom), (255, 255, 1), 4)

# Save image using cv2 module
cv2.imwrite("out.jpg", image)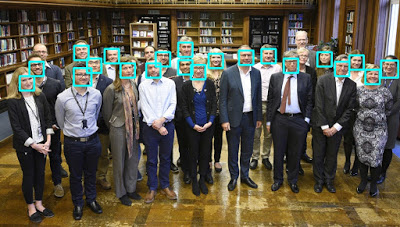
As we can see, it has detected all faces from given image and results are very good. There is also CNN option which you can also try.
Detecting Faces from Camera or Videos
We can also use camera feed or can detect from videos. We will use opencv for this.
- For default webcam.
cv2.VideoCapture(0) - For video path.
cv2.VideoCapture(PATH_TO_VIDEO)
We capture frames from video or web cam feed and then process and show each frame. You can also write video to external path.
Lets dive into code for this. We read and get each frame from video and process each from for detection.
import face_recognition
import cv2

# Capture From Web Cam
cap = cv2.VideoCapture(0)

# If want to use video, replace 0 with video path.
# cap = cv2.VideoCapture(VIDEO_PATH)

while True:
    # Get frame from cap
    _, image = cap.read()

    # Find all the faces in the image using the default HOG-based model.
    face_locations = face_recognition.face_locations(image)

    print("Found {} faces in this photograph.".format(len(face_locations)))
    for face_location in face_locations:
        # Print the location of each face in this image
        top, right, bottom, left = face_location

        # We can draw rectangle using OpenCV rectangle method
        cv2.rectangle(image, (left, top), (right, bottom), (255, 255, 1), 3)

    cv2.imshow("img", image)
    if cv2.waitKey(33) != -1:  # if no key was pressed, -1 is returned
        break
# Release cap
cap.release()

# Distroy windows
cv2.destroyAllWindows()