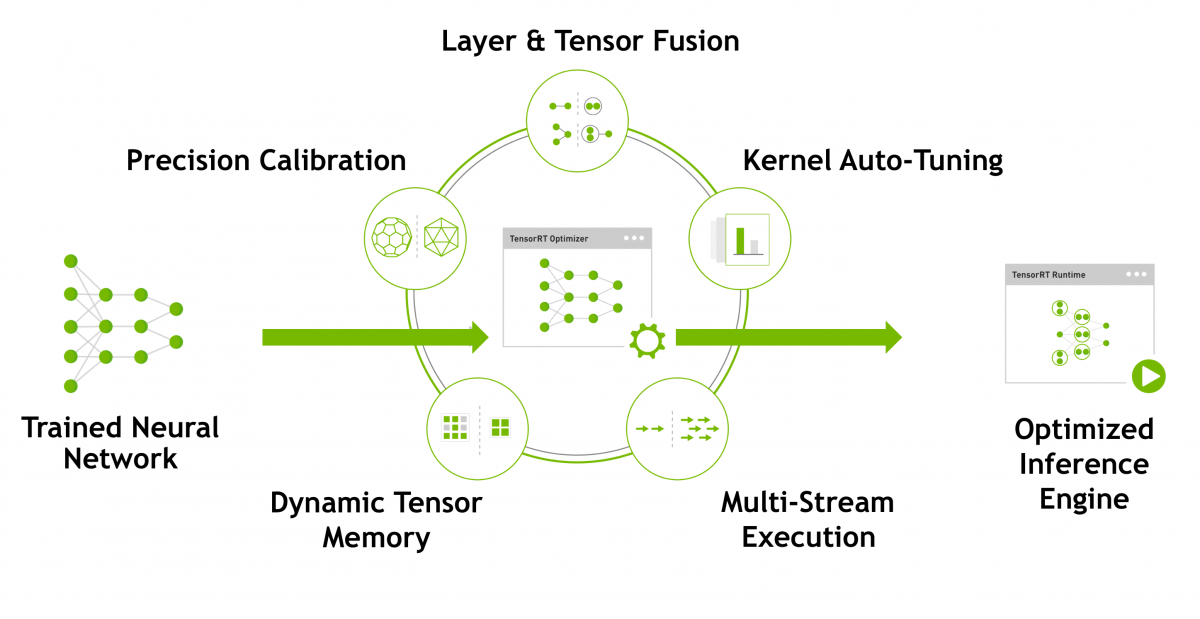
TensorRT is a deep learning SDK provided by Nvidia for optimization of deep learning models for high performance of models. It optimizes models for low latency and high accuracy for deep learning models to provide real time results. TensorRT is a C++ library providing support for major of Nvidia GPUs. It takes a trained model and produces a highly optimized runtime engine for inferece of that specific model. TensorRT combines multiple layers in model, optimizes kernel selection and normalization depending on specified precision for best latency and accuracy. TensorRT provides different benifits for deep learning models, some of them are as follows.
- It decreases inference time for deep learning model.
- Accuracy of optimized model is same or closer to actual model.
- Optimizes system memory to load multiple networks at a time for inference.
Here is basic working demonstration of TRT engine working from Nvidia TensorRT.
TensorRT work with any CUDA compatible GPU and for high efficiency FP16 and INT8 inference, a GPU with Tensor cores is required. TensorRT is available for ubuntu and window both but windows has only C++ support. There are different ways you can use TensorRT for optimization of your model.
- Google Colab: If you have no Ubuntu setup, you can use google colab for optimization of models because it has Tesla T4 and cuda setup, you can install and use TensorRT.
- Ubuntu: If you have a supported GPU, you can setup cuda and install tensorRT and use it.
- Nvidia Docker: Nvidia and other deep learning libraries like Tebsorflow and PyTorch provide GPU compatible images.
Install TensorRT
There are different ways to use TensorRT, we can install using terminal.
Ubuntu:
TensorRT requires cuda and cudnn for GPU usage for Deep Learning models. Once you have setup cuda and cudnn for your system, you can install TensorRT on system using these commands.
wget https://developer.download.nvidia.com/compute/machine-learning/repos/ubuntu1804/x86_64/nvidia-machine-learning-repo-ubuntu1804_1.0.0-1_amd64.deb

dpkg -i nvidia-machine-learning-repo-*.deb
apt-get update

sudo apt-get install libnvinfer6
After setting up TensorRT you can use it for model optimization.
Google Colab:
You can also select Google Colab GPU for optimization. Google colab contain Tesla T4 with cuda and cudnn setup and you just need to install TesnorRT for usage using above commands.
Nvidia Docker:
If you have docker setup, you can install nvidia docker on ubuntu and use any of the deep learning image. After setting up nvidia docker you can pull image from ngc nvidia.
https://ngc.nvidia.com/catalog/containers/nvidia:tensorflow
Save Models as Tensorflow Saved Models
TensorRT requires a Tensorflow saved model, so we can load a model using keras or tensorflow and save it as TensorFlow saved model if already not saved. First we will discuss how we can load and save models as Tensorflow saved model.
Download and Save Model
We can use keras api to fetch pretrained models and then can save as Tensorflow saved model. For this demo, we will be using weights from imagenet data.
from tensorflow.keras.applications.resnet50 import ResNet50

# Load model
model = ResNet50(weights='imagenet')
# save as Tensorflow Saved Model
model.save("resnet50")
Load h5 and Save Model
If you have model saved in HDF5 format, you can use keras to load it first and then save it as Tensorflow saved model.
from tensorflow.keras.models import load_model

# Load HDF5 file using path
model = load_model("my_model.h5")
# save as Tesorflow SavedModel
model.save("my_model")
Inference with saved model
We can load saved model and perform inference with own images to test results and check performance of current model. For loading images from directory, we are using pillow to read images and resize image to desired size.
import tensorflow as tf
from PIL import Image
import numpy as np
from tensorflow.keras.applications.resnet50 import decode_predictions
import matplotlib.pyplot as plt
# load model
model = tf.keras.models.load_model('resnet50')
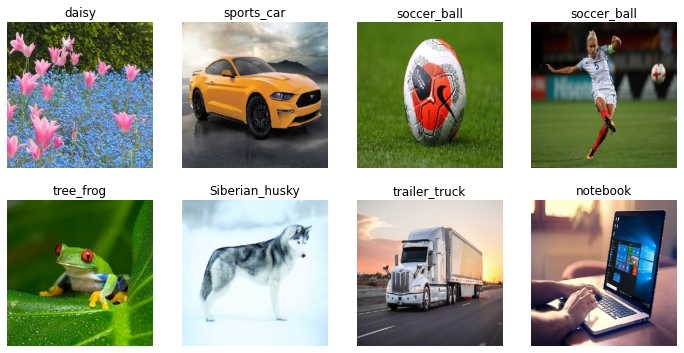
# For this example, images directory contain 8 images for different classes
for i, img_name in enumerate(os.listdir("images")):
# read and preprocess image
image = Image.open(f"images/{img_name}")
image = image.resize((224, 224))
image = np.asarray(image)
image = np.expand_dims(image, axis=0)
# perform prediction
res = model.predict(image)
# show image and label using matplotlib
plt.subplot(2,4,i+1)
plt.imshow(image.reshape(224, 224, 3))
plt.axis('off')
plt.title(decode_predictions(res, top=1)[0][0][1])We have 8 images in directory with different classes, so we plot predictions as follows.
Now we check current model throughput by creating a batched input of 8 image and run for 1000 steps to check how much time it takes to process images and then we will compare it with TensorRT models to check how much performance gain we get. First we need to create a batch of image by reading images from directory and after preprocessing we create a numpy array of size (8, 224, 224, 3) for batched input to model. So, lets first create a batch input and then run for model performance check.
batch_size = 8
batched_input = np.zeros((batch_size, 224, 224, 3), dtype=np.float32)

for i, img_name in enumerate(os.listdir('images')):
    image = Image.open(f"images/{img_name}")
    image = image.resize((224, 224))
    image = np.asarray(image)
    image = np.expand_dims(image, axis=0)
    batched_input[i, :] = image
print('Input shape:', batched_input.shape)
Now we run prediction for model for over 1000 steps and calculate time for processing.
import time

n_runs = 1000
start_time = time.time()
# run for 1000 steps with 8 batch size
for i in range(n_runs):
    labeling = model.predict(batched_input)

end_time = time.time()
print('Throughput: {:.0f} images/s'.format(n_runs * batch_size / (end_time-start_time)))
When we run this prediction, we get this output after running 1000 runs. Throughput: 141 images/s
Convert Model to TensorRT
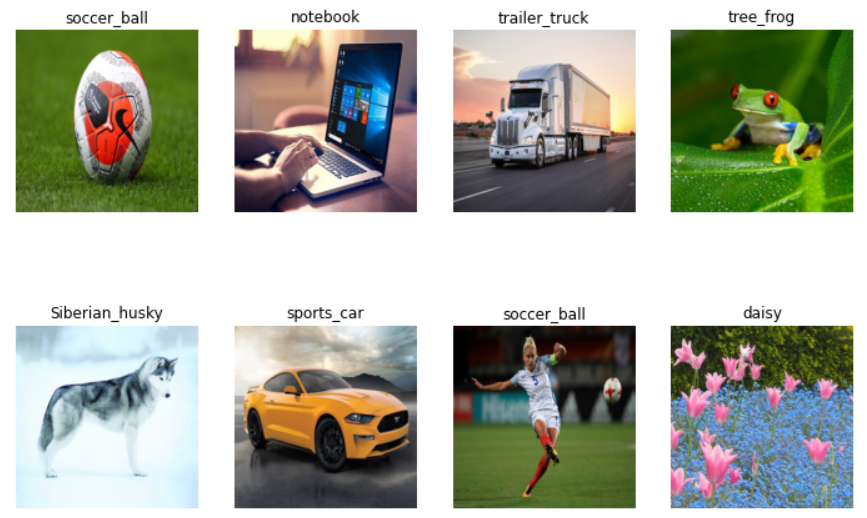
TFRT graphs can be saved as FP32, FP16 or INT8 precision modes. We will convert our model to each of these precisions and check its performance. Now lets first create some data for processing for checking trt models performance and accuracy on custom images. First we create a function to predict and show images.
def predict_tftrt(saved_model_dir):
    saved_model_loaded = tf.saved_model.load(saved_model_dir, tags=[tag_constants.SERVING])
    infer = saved_model_loaded.signatures['serving_default']

    for i, img_path in enumerate(os.listdir("images")):
        # read and preprocess image
        image = Image.open(os.path.join("images", img_path))
        image = image.resize((224, 224))
        image = np.asarray(image)
        x= np.expand_dims(image.astype("float32"), axis=0)
        x= tf.constant(x)

        # predict image
        labeling = infer(x)
        preds = labeling['predictions'].numpy()
        print('{} - Predicted: {}'.format(img_path, decode_predictions(preds, top=3)[0]))
        # show image with label
        plt.subplot(2,4,i+1)
        plt.imshow(image.reshape(224, 224, 3))
        plt.axis('off')
        plt.title(decode_predictions(preds, top=3)[0][0][1])
Now we create another function for calculating model performance on a specific number of images to evaluate model throughput and compare with base model and compare with all trt models that how it performs on each precision. When we load model using TRT, it requires a step to warmup and then available for prediction. So, we run some prediction steps for warmup and then process images for performance of model, after that we run for 1000 steps with batch size of 8 and calculate time for processing images.
import time
from tensorflow.python.saved_model import tag_constants

def benchmark_tftrt(saved_model_dir):
    saved_model_loaded = tf.saved_model.load(saved_model_dir, tags=[tag_constants.SERVING])
    infer = saved_model_loaded.signatures['serving_default']
    # convert to float32 and as tf constant
    batched_input = tf.constant(batched_input.astype("float32"))
    n_warmup_runs = 50
    n_runs = 1000

    # TensorRT requires a little steps to warmup for processing
    for i in range(n_warmup_runs):
      labeling = infer(batched_input)

    start_time = time.time()
    # run for 1000 steps with 8 batch size
    for i in range(n_runs):
      labeling = infer(batched_input)

    end_time = time.time()
    print('Throughput: {:.0f} images/s'.format(n_runs * batch_size / (end_time-start_time)))
TensorRT FP32 model
We first convert and save model as FP32 precision and check its performance. Tensorrt is already included in tensorflow library and we can import it and use for conversion and prediction. For FP32, we can provide these params from Trt Precision mode and can provide max worksapce size bytes.
from tensorflow.python.compiler.tensorrt import trt_convert

# create conversion params with trt FP32
conversion_params = trt_convert.DEFAULT_TRT_CONVERSION_PARAMS._replace(precision_mode=trt_convert.TrtPrecisionMode.FP32,
                                                               max_workspace_size_bytes=8000000000)
# provide saved mode directory and conversion params
converter = trt_convert.TrtGraphConverterV2(input_saved_model_dir='resnet50',
                                    conversion_params=conversion_params)

converter.convert() # start conversion
converter.save(output_saved_model_dir='resnet50_TFTRT_FP32') # save output model
When we convert this model, model is saved as TFTRT_FP32.
INFO:tensorflow:Linked TensorRT version: (0, 0, 0)
INFO:tensorflow:Loaded TensorRT version: (0, 0, 0)
INFO:tensorflow:Assets written to: resnet50_TFTRT_FP32/assets
Now we predict same images using TFTRT-FP32 model and check if there is any change in accuracy.
predict_tftrt("resnet50_TFTRT_FP32")And we can see that there is no change in results.
Now we check if there is any improve in throughput of model.
benchmark_tftrt("resnet50_TFTRT_FP32", batched_input)and we get Throughput: 272 images/s
TensorRT FP16 model
Now we convert model to FP16 precision and perfrom benchmarks.
# create conversion params with trt FP32
conversion_params = trt_convert.DEFAULT_TRT_CONVERSION_PARAMS._replace(precision_mode=trt_convert.TrtPrecisionMode.FP16,
                                                               max_workspace_size_bytes=8000000000)
# provide saved mode directory and conversion params
converter = trt_convert.TrtGraphConverterV2(input_saved_model_dir='resnet50',
                                    conversion_params=conversion_params)

converter.convert() # start conversion
converter.save(output_saved_model_dir='resnet50_TFTRT_FP16') # save output model
Now we can run inference using FP16 model and check its performance for both accuracy and response time using this script.
# check prediction accuracy for FP16 model.
predict_tftrt("resnet50_TFTRT_FP16")

# Benchmark FP16 model throughput
benchmark_tftrt("resnet50_TFTRT_FP16", batched_input)
As we can see, there is no change in accuracy and throughput is also close to FP32 model.
TensorRT INT8 model
When working with INT8 optimization, we need some dataset for calibration of model that we use as input when converting model to INT8. So we can use our batched input as dataset to model when converting to INT8. Also, when performing INT8 optimization in notebooks, we need to reset resources memory because otherwise it cause memory issues.
import os
os.kill(os.getpid(), 9)
Now we need to import all packages and then we can use upper steps to create a batched input for model. Then we can convert model using steps as used before with an additional input of calibration function.
conversion_params = trt.DEFAULT_TRT_CONVERSION_PARAMS._replace(
    precision_mode=trt.TrtPrecisionMode.INT8,
    max_workspace_size_bytes=8000000000,
    use_calibration=True)
converter = trt.TrtGraphConverterV2(
    input_saved_model_dir='resnet50',
    conversion_params=conversion_params)

def calibration_input_fn():
    yield (batched_input, )
converter.convert(calibration_input_fn=calibration_input_fn)

converter.save(output_saved_model_dir='resnet50_saved_model_TFTRT_INT8')
Now we can run our functions to check its accuracy and throughout of model and we get throughput of 282 images/s
Conclusion
So, we can get good model output using TensorRT models optimization while getting almost same accuracy as original model. When you want to deploy this model to cloud you will require some extra steps to use these models or if you are using Docker GPU, you can use GPU images using NVIDIA Docker from NVIDIA or tensorflow.