Azure provides Cognitive services to use vision, speech, language and other deep learning model to use in general. One with no experience in Machine or Deep learning can use Azure Cognitive services in application using sdks to provide AI behaviour in any kind of applications. Azure provides Cognitive services with very low cost.
Azure provides these services for usage in your application.
- Design - Provides sdk for Abnormaly Detector, Content Moderator, Personalizer
- Language - Translation in different languages, QnA Maker, Text analysis, Language Understanding
- Speech - Speech to Text, Text to speech and Speaker recognition
- Vision - Image recognition, face detection and recognizer, video indexer
- Web Search - Web Search API for Bing
These services provides very good results for different type of data. We can use Vision services to identify objects in image.
If someone has no knowledge of Deep learning and want to train a model for Computer Vision(Image Classification and Object Detection), azure provides custom vision
service to train models with no code just by using GUI platform or can use SDK to automate from application.
In this tutorial we will discuss to train an Image Classification model by using both UI and SDK(Python) and use this model for prediction. We can use Custom Vision SDK using C#, Go, Java, JavaScript, Python or REST API. But for this tutorial we will only use Python.
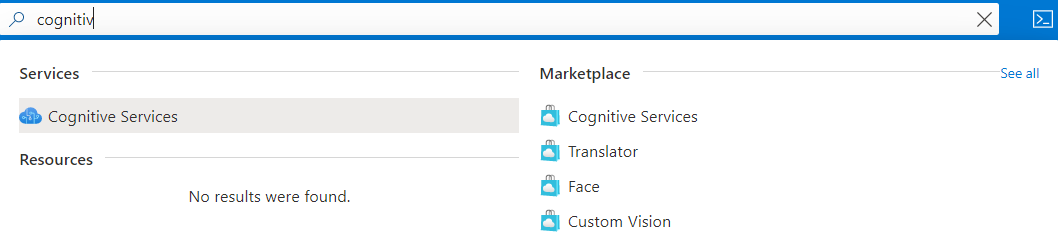
To get started, you need to create an account on Azure. Then navigate to Azure Portal and create a resource group and search for azure cognitive services where you can find custom vision from marketplace.
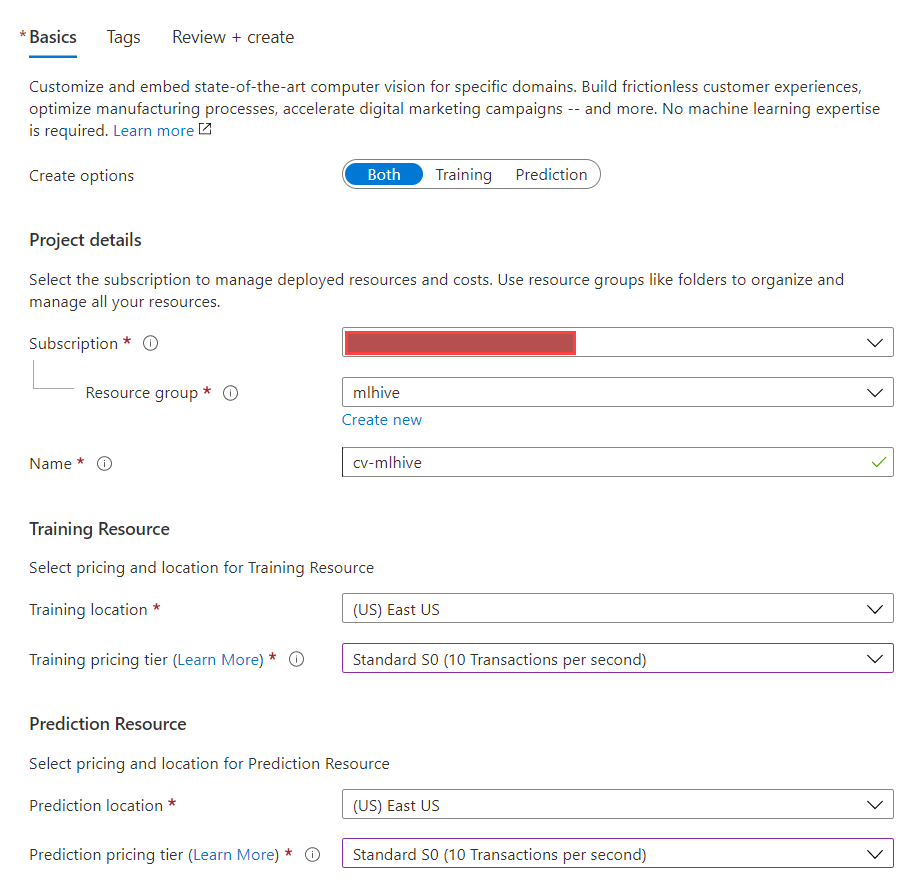
Click on Custom Vision and create a custom vision service. On custom vision page use both training and prediction resources as we will need both to train and use endpoint for predictions. You can name service whatever you want and choose region and pricing tier according to your requirements. After that click to review and create custom vision azure cognitive service.
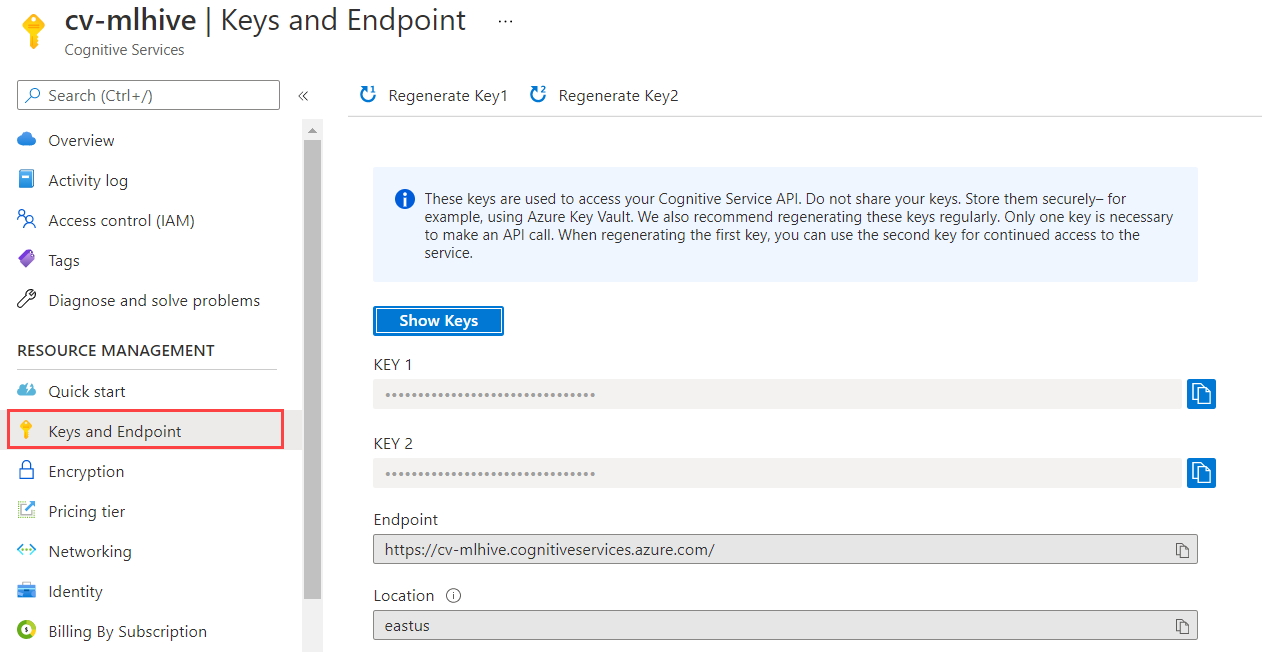
Now after all validation, click on create to create a new service for custom vision, it will create a training and prediction resource which can be used for training your model and also you can use prediction resource to deploy your models and use them in your applications. Once you have created the resource, you can click to open your resource and can view all of your resource details. To use python sdk for azure cognitive services, you need api key and other details such as endpoint and location. You can get them by viewing your resource and click on Keys and Endpoints tab to view details.
After you have created and setup your resource, we can get started with python sdk to create project and upload our data. First we will be required to authenticate sdk using keys above.
Training Using AzureSDK
We will go step by step to authenticate, create tags, upload data and then train model using that data. As a last step, we will deploy and test using new data.
Install and Authenticate Azure Python SDK
First we need to install azure python packages using pip to use these services. To install packages, run these commands in your command promot to install.
pip install azure-cognitiveservices-vision-customvisionAfter install required packages, we can start working by importing required packages that we will use for this project.
from azure.cognitiveservices.vision.customvision.training import CustomVisionTrainingClient
from azure.cognitiveservices.vision.customvision.training.models import ImageFileCreateBatch, ImageFileCreateEntry, Region
from msrest.authentication import ApiKeyCredentials
import time
import os
Now we authenticate using keys from azure portal. We will need training key and endpoint for authentication. You will need to relplace these with your values to work.
ENDPOINT = "https://southcentralus.api.cognitive.microsoft.com/"
training_key = "e4d179b866cf4e8881eaac71a1635dc5"

# authenticate using key and endpoint
credentials = ApiKeyCredentials(in_headers={"Training-key": training_key})
trainer = CustomVisionTrainingClient(ENDPOINT, credentials)
After that we can create a project in custom vision.
Create or Select a Project
We can either create a new project or if we have already created a project, we can can select that project. First we check that how can we create a new project.
project_name = "IntelImageClassification"
project = trainer.create_project(project_name)
Or if you have already a project, you can select it by search by its name.
project_name = "IntelImageClassification"

# Get list of all projects
projects = trainer.get_projects()
project = [project for project in projects if project.name == project_name][0]
Create Tags
Since, we are training a multiclass model with 6 classes, so we need to create tags(classes) first in custom vision, so we can assign each image a tag depending on which tag it belongs to. So we first need to get list of classes locally. For that we can use python's os module to list down each class.
# Get list of classes
classes = os.listdir("data/train")
Output will be like
Output: ['buildings', 'forest', 'glacier', 'mountain', 'sea', 'street']We can use trainer.create_tag method to create a tag, so we iterate over each class in our dataset and create tag. We will also store tag object in a dictionary for later use while uploading data, because it is required for assigning each image a class.
tags = {}
for class_name in os.listdir("data/train"):
    tags[class_name] = trainer.create_tag(project.id, class_name)
Now we are all set for uploading images to custom vision project storage.
Upload Images
We can upload a single image or batch of images at a time. Custom Vision allows upto 64 images in batch during upload. It also check for duplicate images, even if they have same name to avoid duplicate images. So we will iterate over each class and upload a batch size of 64 images at a time.
image_list = []
base_path = "data/train/"
for folder_name in os.listdir(base_path):
    print(f"INFO: Uploading {folder_name} images")
    for img in os.listdir(os.path.join(base_path, folder_name)):
        with open(os.path.join(base_path, folder_name, img), "rb") as image_contents:
            image_list.append(
                ImageFileCreateEntry(name=img, contents=image_contents.read(), tag_ids=[tags[folder_name].id])
            )
        if len(image_list) == 64:
            upload_result = trainer.create_images_from_files(project.id, ImageFileCreateBatch(images=image_list))
            if not upload_result.is_batch_successful:
                pritn("Batch Upload Failed")

            image_list = []
Once, we have uploaded all of images, we can view images in custom vision web app. You can head over to https://customvision.ai and select project to view its images. Now, we need to start training our model.
Train Model
Now we can start training by using sdk to train model using project id, which we want to start training. We can train using default configurations or also can select specific tags or specific duration for training of model.
iteration = trainer.train_project(project.id)Custom Vision does not provide a lot of details during model training, it just provide status of given iteration. We can check status of training iteration, when it is completed, so we can use it.
if iteration.status == "Completed":
    print("Training Completed Successfully")
Once model training is successfull, we can get performance for this iteration using python code.
# get performance data
performance = trainer.get_iteration_performance(project.id, iteration.id)
performance_dict = performance .as_dict() #get performance data as dict

print("Precision:", performance_dict["precision"],
    "\nRecall:", performance_dict["recall"],
    "\nAverage Precision:", performance_dict["average_precision"]
)
The output is as follows.
Precision: 0.9693251
Recall: 0.8229167
Average Precision: 0.9721378
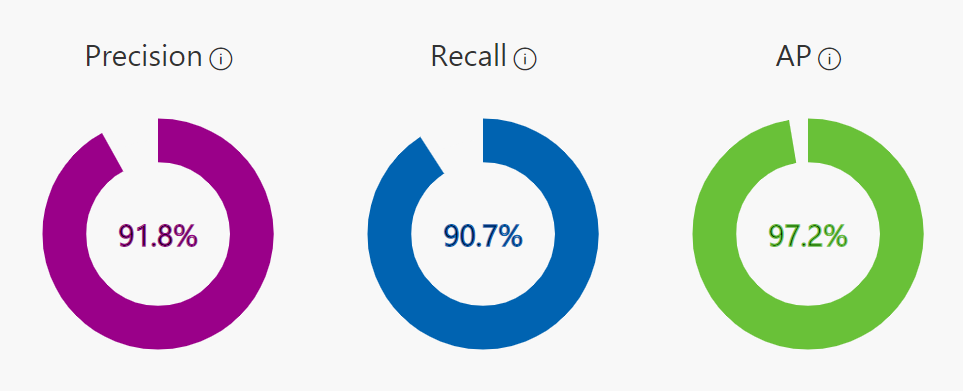
We can also view insights in Custom Vision App where it shows overall performance and single tag performance and provides insights for Precision, Recall and Average Precision.
Deploy Model
We can deploy and use this model in our appllications. To deploy iteration, we need a prediction resource that will be used to deployment of iteration. So, we can get it from our resource for prediction. Once we have api key and endpoint url, we can deploy current iteration.
# Resource ID
prediction_resource_id = "/subscriptions/23ac4010-720f-4069-98b7-52eafee87a40/resourceGroups/mlhive/providers/Microsoft.CognitiveServices/accounts/cvmlhive-Prediction"
publish_iteration_name = "inferenceClassifier"

# Publish iteration
trainer.publish_iteration(project.id, iteration.id, publish_iteration_name, prediction_resource_id)
Once iteration is published, we can use prediction endpoint. We can either use prediction url and send image to url and get response or can use prediction in azure-sdk.
Using CustomVision Prediction Client
from azure.cognitiveservices.vision.customvision.prediction import CustomVisionPredictionClient

# prediction key and endpoint
prediction_key = "3f7665c5dea540c1b81dd718adf5e9f6"
prediction_ENDPOINT = "https://cvmlhive-prediction.cognitiveservices.azure.com/"

# create prediction client
prediction_credentials = ApiKeyCredentials(in_headers={"Prediction-key": prediction_key})
predictor = CustomVisionPredictionClient(ENDPOINT, prediction_credentials)
Now we can read an image and pass to prediction client and get response for an image using its method classify_image. It requires project id, publish iteration name and an image, so we read image and pass it to classifer method.
with open("data/test/buildings/20060.jpg", "rb") as image_contents:
    results = predictor.classify_image(project.id, publish_iteration_name, image_contents.read())
It returns prediction result for all tags with probability score in sorted form. We can simply select our top class or can view score for each class.
print("Top Class: ", results.predictions[0].tag_name, "\nScore:", round(results.predictions[0].probability * 100, 2))And we get output as top class name and also score for that class, in this case it is: Top Class: 'buildings' - Score: 96.88
Or we can iterate over each class/tag and print them.
for prediction in results.predictions:
    print(prediction.tag_name + ": {0:.2f}%".format(prediction.probability * 100))
Using Prediction API
We can also use http prediction api to send image to custom vision and get prediction results. We can get prediction url for custom vision web page of project or can use predictor to get prediction endpoint.
base_url = predictor.config.base_url.format(Endpoint=prediction_ENDPOINT[:-1])
prediction_url = f"{base_url}/{project.id}/classify/iterations/{publish_iteration_name}/image"
We can either send image to api or also can send an image url, so we need to add /image or /url at end of prediction url. We will also need prediction api key, that we have used before.
Sending Image: We read and send image to api and show results.
import requests
headers = {'Content-Type': 'application/octet-stream', "Prediction-Key" : prediction_key}
# read and send image
with open("data/test/buildings/20060.jpg", "rb") as image_contents:
    r = requests.post(prediction_url + "/image", data=image_contents.read(), headers=headers)

# if response is ok, we get results
if r.status_code == 200:
    response = r.json()

    predictions = response['predictions'] # get predictions list
    print(predictions[0]['tagName'], ": {0:.2f}%".format(predictions[0]['probability'] * 100)) # print top prediction
This way we can use any programming language to send prediction request to custom vision api endpoint and can easily use it. We can also send multiple images depending on price tier you have selected.
More Steps
We can work further to upload new images and retrain model and deploy it for usage. For more info you can vision custom vision website or can read docs from microsoft.
- https://docs.microsoft.com/en-us/azure/cognitive-services/custom-vision-service/
- https://www.customvision.ai/
Even if you have no programming experience, you can use custom vision web app to upload images and train vision models. In next post we will discuss about further models with custom vision api.