Object Detection is a widely used in Computer Vision and Image Processing for detection and localization of objects in images like cars, person, trees or any other object. We use object detection to get exact position of object in a given image. In videos, we process frames of videos for detection and tracking of objects in frames. Object detection has a wide variety of applications including traffic monitoring, security and surveillance, medical images processing and many other fields.
There are different type of approaches available for achieving this task using different libraries like Tensorflow, Pytorch and many other libraries or one can build custom code to achieve this. For this tutorial, we are using YOLO (You Only Look Once) from darknet. We are using its latest implementation from Ultralytics for training and deployment of model using YoloV5.
YoloV5 requires different steps to convert current data to required data format. So, we will be following those steps to prepare, preprocess, train, eveluate and usage of models using YoloV5.
Dataset Preparation
For Object detection, we need to label a certain number of images per class for training of model. We can label this dataset using different annotation tools like LabelImg, LabelStudio and many other avaialble annotation tools. For lableimg, you can follow this tutorial how to getting started using this tool.
https://www.youtube.com/watch?v=gT6y0u3YfTM
For this we are using dataset of sugarcane which consists of two classes as nodes or buds. Here are some example of data for a better understanding.
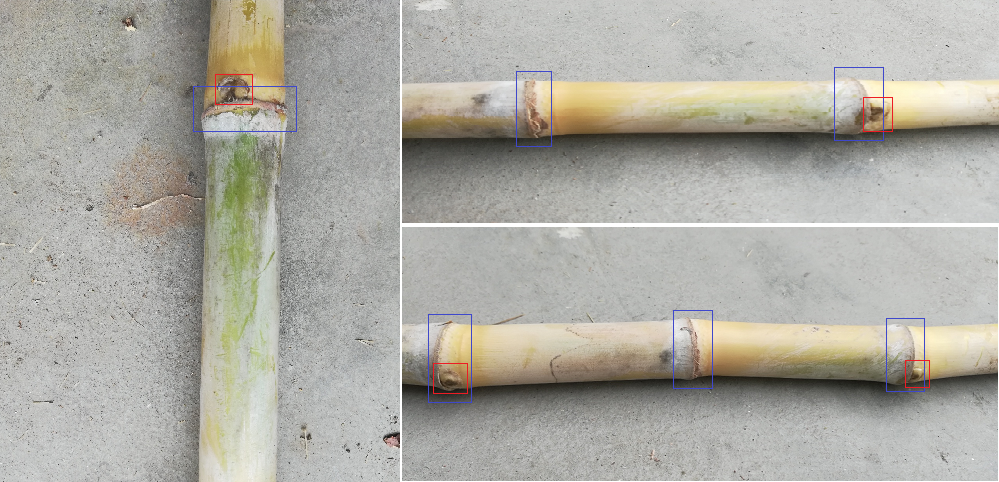
We have labeled with data using labelimg tool as pascal voc format (You can also export data as yolo format). So, first we need to convert data from pascal voc to yolov5 format.
Data Preprocessing
We have 1167 images with equal xml annotations in a directory. For getting started, we will get list of all annotations and split them in 3 parts as training, testing and validations so that we can validate and test model performance using this data. So, lets dive in.
First, get list of all xml annotations from dataset directory.
import os
# dataset directory. Change with your own path
DATASET_DIR = "D:/SugarCane"

# list of all XML annotations
annotations = [filename for filename in os.listdir(DATASET_DIR) if filename.endswith(".xml")]
Now, once we have list of all the annotations from directory, we will split this data using sklearn's module train_test_split. We will split data into 75% training and training data into two parts as test and validation.
from sklearn.model_selection import train_test_split
# split into train and test
train_annotations, test_annotations = train_test_split(annotations, test_size=0.25)
# further split test into test and validation
test_annotations, val_annotations = train_test_split(test_annotations, test_size=0.5)

# View data in all splits
print("Training:", len(train_annotations), "Validation:", len(val_annotations), "Test:", len(test_annotations))Training: 875 Validation: 146 Test: 146Once we split data, now we need to read each xml and convert into pascal voc format and also save all splits into sub directories so that we can easily access them. YoloV5 requires a text file for each image with all of annotations for that image in a single txt file as this format.
# class_number start from 0
class_number center_x center_y width height

# examples
0 0.532552 0.335177 0.084780 0.023220
1 0.522424 0.656253 0.019386 0.013888
First we write some helper functions to read a xml file and conver bbox coordinates to yolo format and save as text file.
import os
import cv2
import xml.etree.ElementTree as ET
import shutil
# classes we want to use
classes = {"node" : 0, "bud" : 1}

def xml_to_txt(path, dest):
    # read xml file using xml.etree
    tree = ET.parse(path)
    root = tree.getroot()

    # output labels txt file
    file = open(dest, "w")
    # iterate over each annotation in file
    for member in root.findall('object'):
        class_name = member[0].text
        if class_name not in classes: continue # if classes is not in defined classes, ignore it
        # image width and height
        image_width = int(root.find('size')[0].text)
        image_height = int(root.find('size')[1].text)
        # bbox coordinates
        xmin = int(member[4][0].text)
        ymin = int(member[4][1].text)
        xmax = int(member[4][2].text)
        ymax = int(member[4][3].text)

        # convert bbox coordinates to yolo format
        center_x = (xmin + (xmax - xmin) / 2) / image_width # Get center (X) of bounding box and normalize
        center_y = (ymin + (ymax - ymin) / 2) / image_height # Get center (X) of bounding box and normalize
        width = (xmax - xmin) / image_width # Get width of bbox and normalize
        height = (ymax - ymin) / image_height # Get height of bbox and normalize
        # write to file
        file.write(f"{classes[class_name]} {center_x} {center_y} {width} {height}\n")
    # close file
    file.close()
Now we will write another functions which accepts a list of annotations that we created using train test split method and pass to this function for creation of txt file. In addition to this, we also need to create a txt file containing all image in specified split. Also copy image for data directory to each of this split directory alongside annotations txt file.
def process_list(xmls, destination_dir, split_type):
    # open/create images txt file
    destination_dir_file = open(f"{destination_dir}/{split_type}.txt", "w")
    # destination directory for images and txt annotation
    destination_dir = f"{destination_dir}{split_type}"
    os.makedirs(f"{destination_dir}", exist_ok=True) # create path if not exists
    for xml_filename in xmls: # iterate over each xml
        # convert to txt using function and store in given path
        txt_name = xml_filename.replace('.xml', '.txt')
        xml_to_txt(f"{DATASET_DIR}/{xml_filename}", f"{destination_dir}/{txt_name}")

        # copy image to destination path
        image_name = xml_filename.replace('.xml', '.jpg')
        shutil.copy(f"{DATASET_DIR}/{image_name}", f"{destination_dir}/{image_name}")
        # add image path to txt file
        destination_dir_file.write(f"{destination_dir}/{image_name}\n")
    # close file
    destination_dir_file.close()
Now we need to pass each split and store in give directories.
processed_path = "D:/SugarCanProcessed/"
process_list(train_annotations, processed_path , "train")
process_list(test_annotations, processed_path , "test")
process_list(val_annotations, processed_path , "val")
After execution of this code, we will have 3 directories and 3 txt files containing image path for those directories. Now we can move next step to configure and train model using YoloV5
Training
For training, first clone or download code repository from given github url.
git clone https://github.com/ultralytics/yolov5Now, if you have all requirements already installed, you are good to go, otherwise install required libraries from requirements.txt file using this command.
pip install -r requirements.txtAfter installation of requirements, we need to create a yml config file. We can create this file in root directory of this code where we need to define class names, text file path for all train, test and validation dataset. We can also pass images directory for this.
# train and val datasets (image directory or *.txt file with image paths)
train: D:\SugarCanProcessed\train.txt
val: D:\SugarCanProcessed\val.txt
test: D:\SugarCanProcessed\test.txt

# number of classes
nc: 2

# class names
names: ['Node', 'Bud']
Now we can start training of model. Ultralytics offers different type of pretrained model from small to xlarge which have different map score and speed. We will be using XLarge model, it will take more time to train but will provide good accuracy. You can select model based on your requirements.

Now we will start training. train.py is used to train models and have defined all arguments that we can pass to chage behaviour of model and output. We can define input image size, logs details, pretrained model selection and many other parameters. First we start with basic training process.
# input image size is 640x640 - batch size 16 and will train for 3 epochs
# sugarcane.yml is file we created above
# it will download model if it does not exists locally.
python train.py --img 640 --batch 16 --epochs 3 --data sugarcane.yaml --weights yolov5xl.pt
With Xlarge model and batch size of 16, you may find gpu memory error and you can resolve this by decreasing batch size. It will store weights and model files in experiments directory inside train folder. Once training is complete, it will also store validation and testing output.
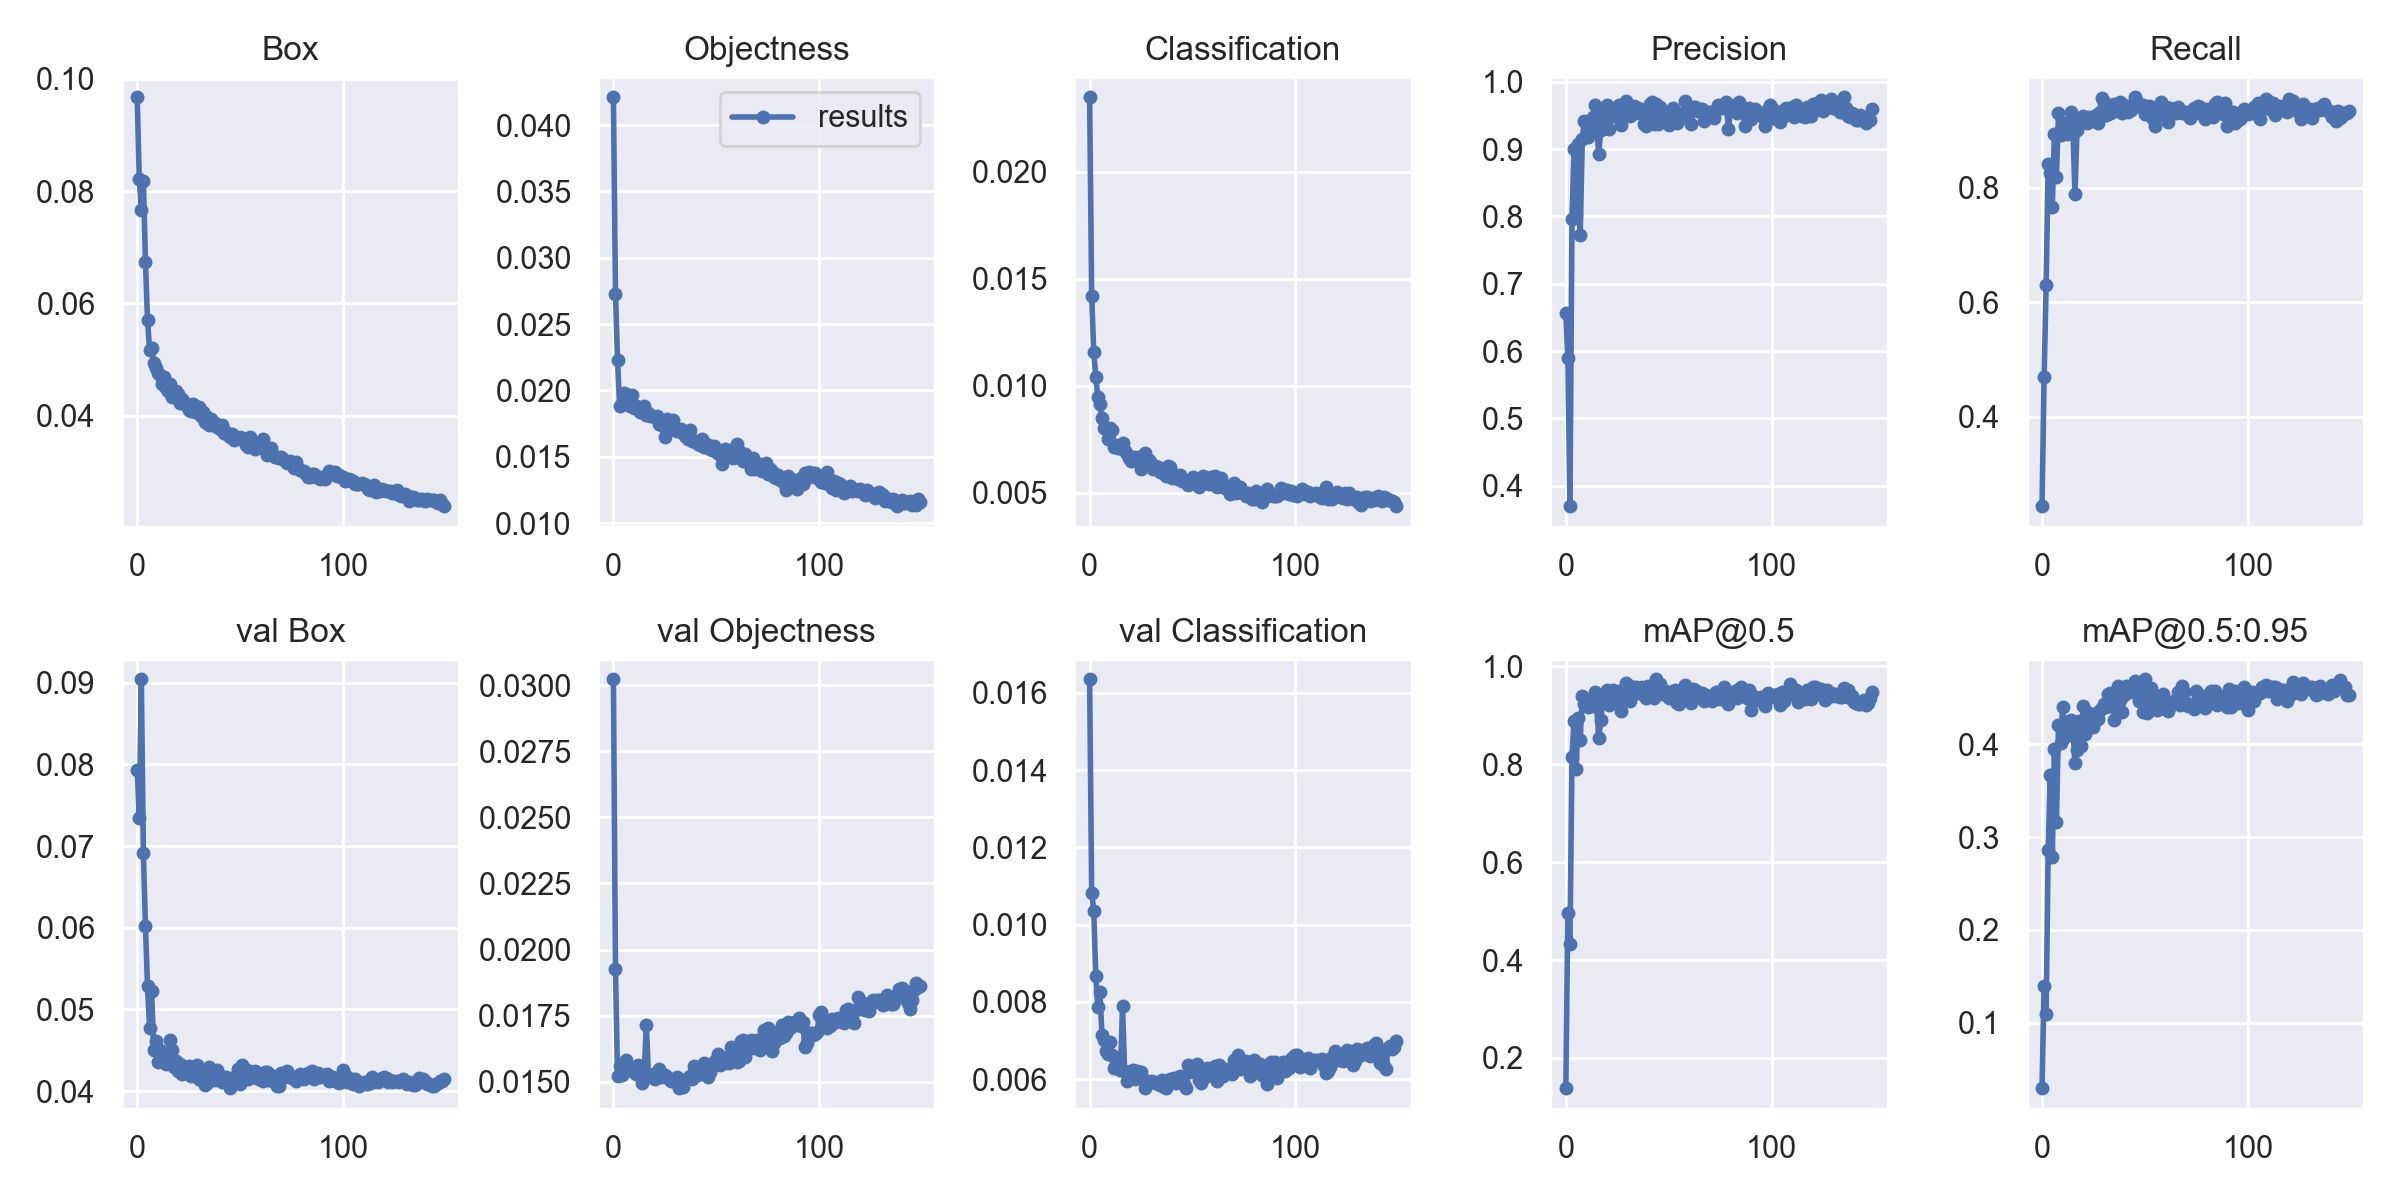
We cal also specify which data we want to log using arguments and can also resume training in case training stops before completion. Optimizers, GPU devices and other configurations can also be handled using arguments. To get full list of arguments, you can view train.py file. Once training is complete, we can view output graphs for loss and accuracy.
It also procduces output for test image batches which we can check to view how model is performing on test dataset. It process all images in test batches and produces output for some random batches for visualization.
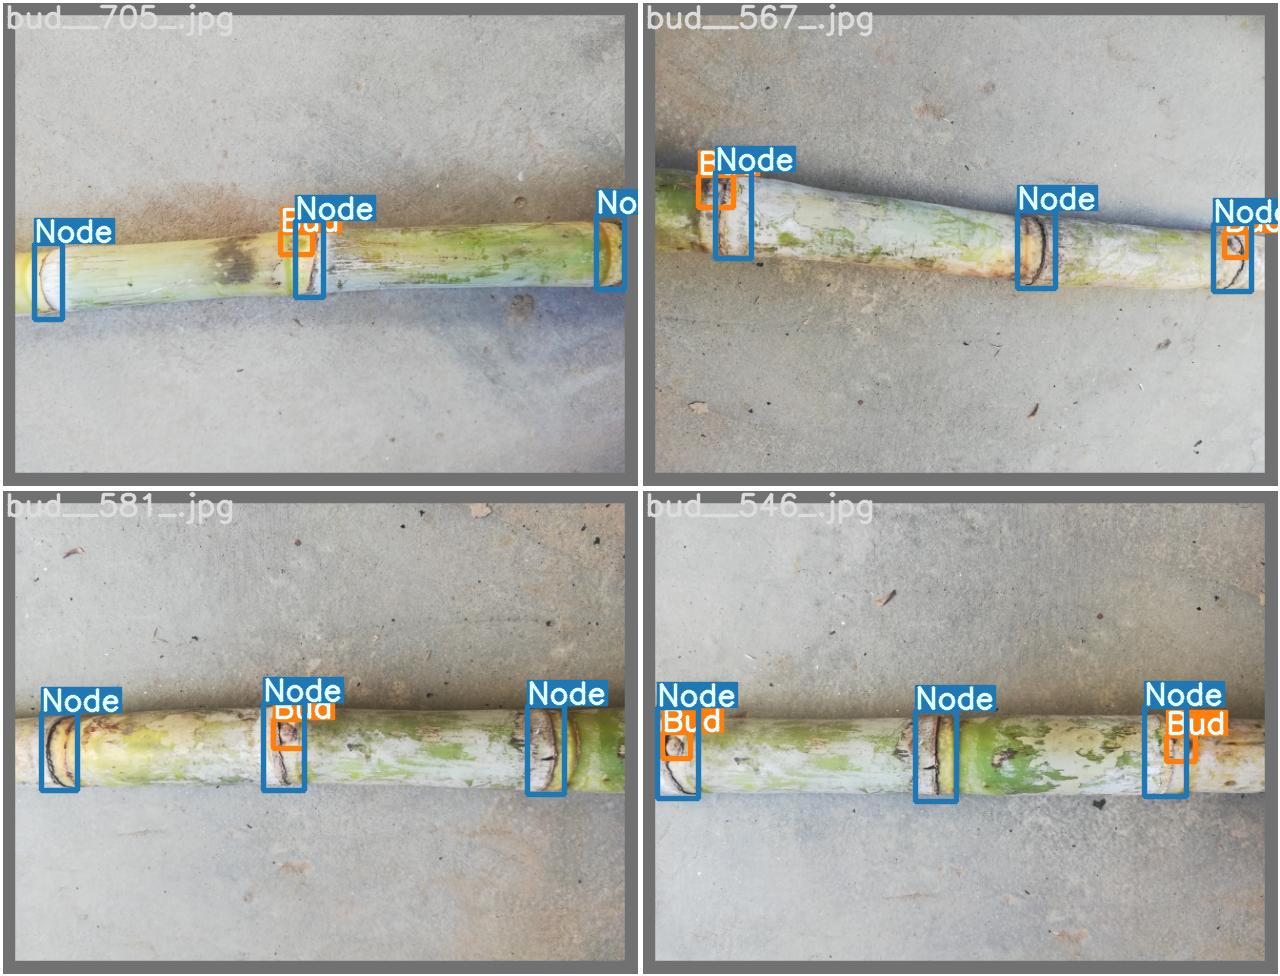
Our model is perfoming very good on test dataset as it has very low noise and visible objects, you may need to train for a large number of epochs and some good amount of training images to achieve good accuracy.
Evaluation and Usage
Once training process is complete, we can view best weights in expriment folder and can use it for inference. I have customized inference script to process an input image for a given model.
import os
import shutil
import time
from pathlib import Path

import cv2
import torch
import torch.backends.cudnn as cudnn
from numpy import random

from models.experimental import attempt_load
from utils.datasets import letterbox
from utils.general import (non_max_suppression, scale_coords, strip_optimizer, check_img_size)
from utils.torch_utils import select_device, time_synchronized
import numpy as np


# load model
def init():
    global model
    global names
    global imgsz
    global device
    imgsz = 640
    device = select_device("")
    # Load model
    model = attempt_load("weights/best.pt", map_location=device)  # load FP32 model
    imgsz = check_img_size(imgsz, s=model.stride.max())  # check img_size


    names = model.module.names if hasattr(model, 'module') else model.names

# get fdetections
def detect_image(img_main):
    img = torch.zeros((1, 3, imgsz, imgsz), device=device)

    img = letterbox(img_main, new_shape=imgsz)[0]
    img = img[:, :, ::-1].transpose(2, 0, 1)  # BGR to RGB, to 3x416x416
    img = np.ascontiguousarray(img)
    img = torch.from_numpy(img).to(device)

    img = img.float()  # uint8 to fp16/32
    img /= 255.0
    if img.ndimension() == 3:
        img = img.unsqueeze(0)

    # pred
    pred = model(img, augment=False)[0]

    # Apply NMS
    pred = non_max_suppression(pred, 0.4, 0.5, classes=None, agnostic=False)


    results = []
    # Process detections
    for i, det in enumerate(pred):  # detections per image
        if det is not None and len(det):
            # Rescale boxes from img_size to img_main size
            det[:, :4] = scale_coords(img.shape[2:], det[:, :4], img_main.shape).round()

            # Write results
            for *xyxy, conf, cls in reversed(det):
                results.append({
                    'xmin' : int(xyxy[0]),
                    'ymin' : int(xyxy[1]),
                    'xmax' : int(xyxy[2]),
                    'ymax' : int(xyxy[3]),
                    'class' : names[int(cls)]
                })
    return results
Now we can read an image using opencv/pillow and provide it to this function for output.
import cv2
# read image using opnecv
image = cv2.imread("IMAGE_PATH")
resp = detect_image(cv2.cvtColor(image, cv2.COLOR_BGR2RGB)) # pass RGB image
# iterate over each detection and draw on image
for bbox in resp:
    cv2.rectangle(image, (resp['xmin'], resp['ymin']), (resp['xmax'], resp['ymax']), (255, 0, 0), 2) # draw rectangle

cv2.imshow("image", image)
cv2.waitKey(0)
cv2.destroyAllWindows()
For more details on yolov5, view documentation and details on its repository.
https://github.com/ultralytics/yolov5/wiki/Train-Custom-Data