Mediapipe offers models with very good accuracy and very less latency on both desktop and mobile devices. It provides 3D Hand Landmark model using machine learning techniques to predict 21 points from a single frame and can work on desktop, mobile or browsers etc. Here is details of all the points that mediapipe provides for a single hand.

It has very low latency even on cpu devices and can provide very good results. We will be using python to process images or frames from a video or a webcam.
Getting Started
Mediapipe package can be installed from pip using this command.
pip install mediapipeIt takes input image as numpy array and offers different models based on complexity for accuracy and speed. Like other models we can use static image mode or when using video we can set it to false to track landmarks in other frames accordingly. Here is the list of configuation options that we can use with it.
- STATIC_IMAGE_MODE: If input is single image we set it to true, otherwise set false to track frames
- MAX_NUM_HANDS: Maximum number of hands in frame, default 2
- MODEL_COMPLEXITY: Two models 0 or 1 where 1 provides better results than 0
- MIN_DETECTION_CONFIDENCE: Detections confidence
- MIN_TRACKING_CONFIDENCE: If tracking frames, then tracking confidence
Output for input image could contains these values
- MULTI_HAND_LANDMARKS: Detection or tracked landmarks as a list
- MULTI_HAND_WORLD_LANDMARKS: Real world 3D coordinates
- MULTI_HANDEDNESS: Handness detection as left or right hand with score.
Handedness is determined assuming the input image is mirrored, i.e., taken with a front-facing/selfie camera with images flipped horizontally. If thats not the case, we need to flip image before input to model.
Process Image
Now we can import required packages and create a model inference object. It fetches model from internet and load into memory automatically on load.
import cv2
import mediapipe as mp
mp_drawing = mp.solutions.drawing_utils
mp_drawing_styles = mp.solutions.drawing_styles
mp_hands = mp.solutions.hands

# For static images:
mp_model = mp_hands.Hands(
    static_image_mode=True, # only static images
    max_num_hands=2, # max 2 hands detection
    min_detection_confidence=0.5) # detection confidence

# we are not using tracking confidence as static_image_mode is true.
Now we an image using opencv and provide as input to moediapipe model for inference as RGB image.
image = cv2.imread("images/fingergun.jpg")
# now we flip image and convert to rgb image and input to model
image = cv2.flip(image, 1)

results = mp_model.process(cv2.cvtColor(image, cv2.COLOR_BGR2RGB))
It provides all outputs described above. Lets check each output and plot on images with labes.
Process Results
Now we process all results from model and visualize and draw on image.
Handedness
First we check handedness from model to check wheter hand is left or right with score and it provides labels in list as there could be more than 1 hand.
# Get handedness
print(results.multi_handedness)[
classification {
index: 1
score: 0.9940045475959778
label: "Right"
}
]Get Landmarks
Now we can get landmarks from landmarks list and we print some of the landmark points and draw on image using mediapipe drawing utilities. To get list of all possible hand landmark points, we can get using
mp_hands.HandLandmark which provides a list of point labels. Mediapipe output points in normalized output and we have to multiply all x values by image width and all y values by image height.image_height, image_width, c = image.shape # get image shape
# iterate on all detected hand landmarks
for hand_landmarks in results.multi_hand_landmarks:
# we can get points using mp_hands
print(f'Ring finger tip coordinates: (',
f'{hand_landmarks.landmark[mp_hands.HandLandmark.RING_FINGER_TIP].x * image_width}, '
f'{hand_landmarks.landmark[mp_hands.HandLandmark.RING_FINGER_TIP].y * image_height})'
)Ring finger tip coordinates: ( 1339.2894973754883, 1302.6893091201782)Draw on Image
Now we can draw on image using mediapipe drawing utils.
for hand_landmarks in results.multi_hand_landmarks:
    mp_drawing.draw_landmarks(
        image, # image to draw
        hand_landmarks, # model output
        mp_hands.HAND_CONNECTIONS, # hand connections
        mp_drawing_styles.get_default_hand_landmarks_style(),
        mp_drawing_styles.get_default_hand_connections_style())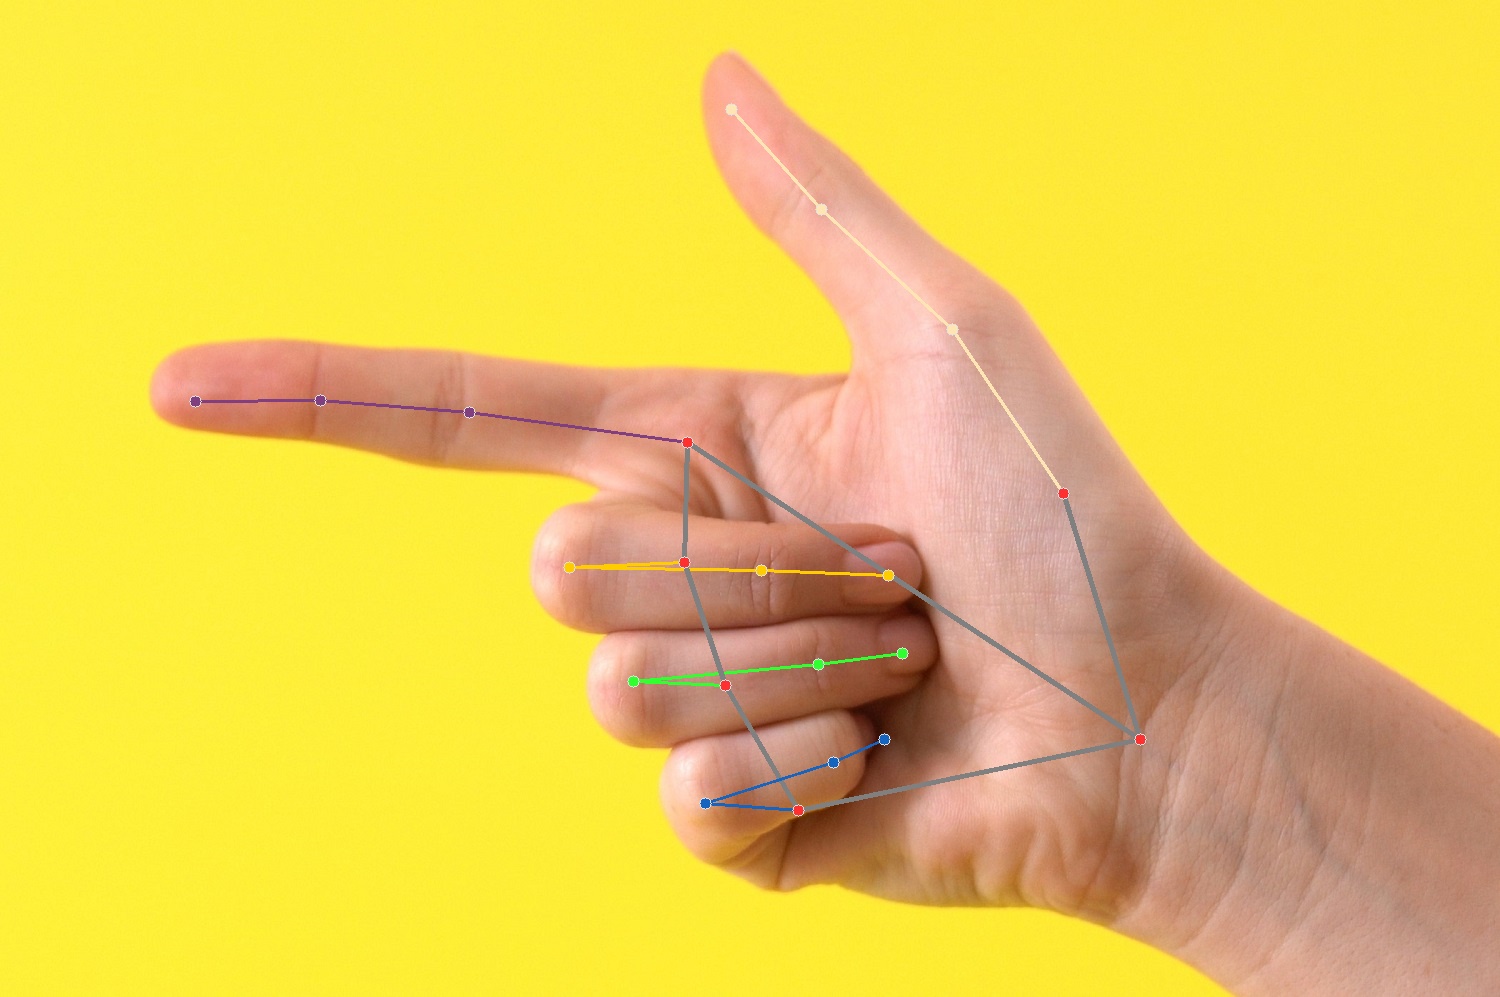
It labels and joins points for each finger seperately using mediapipe tools. Now we create a function to process list of images.
Process Images List
For multiple images processing, we create a function using above code which can accept an input and output path and write images to that directory.
def processImage(image_path, output_dir):
    """ Process input image and save output image to given directory. """
    image = cv2.flip(cv2.imread(image_path), 1)
    if image is None: return
    # Convert the BGR image to RGB before processing.
    results = hands.process(cv2.cvtColor(image, cv2.COLOR_BGR2RGB))

    if not results.multi_hand_landmarks:
        return # if there are no detections, we can skip the rest of the code in this function

    for hand_landmarks in results.multi_hand_landmarks:
        mp_drawing.draw_landmarks(
            image,
            hand_landmarks,
            mp_hands.HAND_CONNECTIONS,
            mp_drawing_styles.get_default_hand_landmarks_style(),
            mp_drawing_styles.get_default_hand_connections_style())
    # flip and write output image to disk
    cv2.imwrite(f"{output_dir}/{image_path.split('/')[-1]}", cv2.flip(image, 1))
Now we can pass multiple images using loop to read image files from directory, process and save to output directory.
import os
for image in os.listdir("images"):
    processImage(f"images/{image}", "output")
We can also input frames from videos or webcam to model and get real time results.
Process Video
Opencv provides utils to read video inputs, webcam or network feed for processing videos. We will use opencv to read each frame and input to model for processing.
# For static images:
hands = mp_hands.Hands(
    static_image_mode=False,
    max_num_hands=2,
    min_detection_confidence=0.5)

cap = cv2.VideoCapture("videos/Manos.mov")

while cap.isOpened():
    success, image = cap.read()
    if not success:
      print("Ignoring empty camera frame.")
      # If loading a video, use 'break' instead of 'continue'.
      continue

    image = cv2.cvtColor(image, cv2.COLOR_BGR2RGB)
    results = hands.process(image)

    # Draw the hand annotations on the image.
    image = cv2.cvtColor(image, cv2.COLOR_RGB2BGR)
    if results.multi_hand_landmarks:
      for hand_landmarks in results.multi_hand_landmarks:
        mp_drawing.draw_landmarks(
            image,
            hand_landmarks,
            mp_hands.HAND_CONNECTIONS,
            mp_drawing_styles.get_default_hand_landmarks_style(),
            mp_drawing_styles.get_default_hand_connections_style())

    # Flip the image horizontally for a selfie-view display.
    cv2.imshow('MediaPipe Hands', cv2.flip(image, 1))
    if cv2.waitKey(25) & 0xFF == ord('r'):
      break

cap.release()
cv2.destroyAllWindows()def get_bbox_coordinates(handLadmark, image_shape):
"""
Get bounding box coordinates for a hand landmark.
Args:
handLadmark: A HandLandmark object.
image_shape: A tuple of the form (height, width).
Returns:
A tuple of the form (xmin, ymin, xmax, ymax).
"""
all_x, all_y = [], [] # store all x and y points in list
for hnd in mp_hands.HandLandmark:
all_x.append(int(handLadmark.landmark[hnd].x * image_shape[1])) # multiply x by image width
all_y.append(int(handLadmark.landmark[hnd].y * image_shape[0])) # multiply y by image height
return min(all_x), min(all_y), max(all_x), max(all_y) # return as (xmin, ymin, xmax, ymax)