Introduction
AzureML is a machine learning cloud-based service from Azure cloud used for development, training and deployment of Machine Learning models and solutions. AzureML offers different kind of features for processing of large data on cloud, development of machine learning models and training and at last deployment of models as web service. It can manage datasets, training stats and multiple trained models which than later on can be used for testing.
AzureML offers a very owesome GUI tool for performing all tasks from preprocessing to deployment of models. It is very useful for people who want to use it with less programming or cloud knowledge. One can easily build pipelines for processing and training of models and visualization of data and perform inference in required language using web service. But if you want to implement complete flow in your application, azure also offers its SDK which than can be used for automation of tasks on users requirements.
In this tutorial, we will be using AzureML tools for python for creating complete flow of AzureML working from creating datasets to inference of final models using web service. Azure has created multiple python packages to authenticate and access azureml services, which we can use to perfrom all tasks that it offers using its GUI tools.
Installation
So, we will be using AzureML python tools for this complete tutorials. For using Azure services, you will need an azure account and its details because it is required to access AzureML services. So first create an account on Azure Cloud and get details from azure account. We will need some details depending on authentication method we use in our code. First we need to install required python packages that we need for azure ml services assuming you have python already installed in your system.
pip install azureml azureml-coreNow after installing required packages, we need to setup our authentication and resource creation. Using python tools we need no GUI features of azure portal except some keys and ids for authentication.
AzureML Authentication
We need to authenticate to azure to use its services. Azure offers different authentication methods for authentication with your account for access. We can either login using browser using Azure Interactive Login authentication or can use Azure Service Principal authentication to avoid browser login which is useful when we are implementing this in our applications.
Interactive Login Auth
Now we need to authenticate with azure portal. For this if we are using Interactive Login authentication feature, we just need a tenant id which we can get from azure portal under Azure Active Directory section. In Azure AD section, we click on properties tab and can get tenant id from that section. On code execution it will open a browser window to authenticate.
from azureml.core.authentication import InteractiveLoginAuthentication
# interactive authentication
interactive_auth = InteractiveLoginAuthentication(tenant_id="YOUR_TENANT_ID")
or we can use Azure Service Principal authentication.
Service Principal Auth
Azure service principal authentication requires service principal id and password for authentication with tenant id. We can get these details by creating application in azure active directory and can get these details. It is useful when we are working with an app and requires to use in a cloud.
from azureml.core.authentication import ServicePrincipalAuthentication

svc_pr = ServicePrincipalAuthentication(
                tenant_id="TENANT_ID",
                service_principal_id="SERVICE_PRINCIPAL_ID",
                service_principal_password="YOUR_SP_PASSWORD")
Once our authentication is done, we can create our workspace.
Create Workspace
A workspace requires multiple resource including storage, keyvault, insights etc. While creating workspace, we need to provide a couple of arguments to method which include these values.
- Name - Name of workspace we are creating
- Subscription ID - We can get subscription id from our subscription on azure portal.
- Resource Group - We provide name of resource group we are using
- Create RG - If resource group not exists, it will be created
- Auth - Authentication details that we have done in eariler step
- Location - Location that we will be using on cloud
from azureml.core import Workspace
ws = Workspace.create(name = 'ml-classifier', # workspace name
                      subscription_id = 'YOUR_SUBSCRIPTION_ID', # subscription ID
                      resource_group = 'mlhive', # Resource group name
                      create_resource_group = True,
                      auth = interactive_auth,
                      location = 'westeurope') # For example: 'westeurope' or 'eastus2'.
Workspace creation may take a couple of minutes to create. After creating workspace, we can save configuration details to a file so we can use it to load workspace from configuration file.
ws.write_config(path='.azureml')If you have already created a workspace, we can load it using condif file or some workspace details.
To load workspace from configuration, we can just call its method to load workspace. It will automatically look for .azureml file in current directory.
ws = Workspace.from_config()If you don't have config file, it requires authentication details, subscription id and workspace name.
ws = Workspace(subscription_id="SUBSCRIPTION_ID", resource_group = "mlhive",
                workspace_name = "ml-classifier", auth = interactive_auth)
Create Compute Cluster
Azure offers both CPU and GPU VM clusters with different specs that we can create according to our compute requirements. Each vm has a name assigned w.r.t its compute class and have different pricing. We can get all details on latest pricing and compute vm availability from azure.
https://azure.microsoft.com/en-us/pricing/details/machine-learning/
So, for this tutorial we create a CPU cluster as we will be creating a simple image classification model with limited number of images. If we have already created a cluster we can fetch it using its name and can use it for training model.
from azureml.core.compute import ComputeTarget, AmlCompute
from azureml.core.compute_target import ComputeTargetException

# Compute Cluster Name
cpu_cluster_name = "ml-classifier-cluster"

# We need to verify that cluster does not exist.
# we try to create cluster, if it exists, we use that cluster
try:
    cpu_cluster = ComputeTarget(workspace=ws, name=cpu_cluster_name)
    print('Found existing cluster, use it.')
except ComputeTargetException:
    compute_config = AmlCompute.provisioning_configuration(vm_size='STANDARD_D2_V2', max_nodes = 1,
                                                           idle_seconds_before_scaledown=2400)
    cpu_cluster = ComputeTarget.create(ws, cpu_cluster_name, compute_config)

# Wait for process to finish
cpu_cluster.wait_for_completion(show_output=True)
Once we setup compute cluster, now we need to setup training. Training mainly requires training code and dataset which we need to setup step by step.
Create Dataset
For this tutorial, we are using flowers dataset from kaggle. It consists of images for 5 classes of flowers. We have discussed this in details in our previous post "Train Image Classification Model using Tensorflow2". So, we will be using that prevous data and code of training model.
There are different ways we can use datasets while training models in AzureML depending on type of data and where is our data stored. Azure also offers dataset feature in its AzureML to fetch and provide data to training script easily with less latency. So for this we will be storing our data in azure blob and will be using it for training model. First we need to upload data to azure blob storage.
from azure.storage.blob import BlobServiceClient
import os

AZURE_STORAGE_CONNECTION_STRING = "CONNECTION_STRING"
blob_service_client = BlobServiceClient.from_connection_string(AZURE_STORAGE_CONNECTION_STRING)

# iterate over each image in all directories and upload to storage
for r,d,f in os.walk("flower_photos"):
    if f:
        for filename in f:
            path = os.path.join(r, filename)
            blob_client = blob_service_client.get_blob_client(container="datasets", blob=path)
            with open(path, "rb") as data:
                blob_client.upload_blob(data, overwrite=True)
Once, you have uploaded images to blob storage, its time to create and register dataset. We first register a blob datastore which we will need to create dataset and register it so we can access it later in training script.
from azureml.core import Datastore, Dataset

blob_datastore_name='DATASTORE_NAME' # Name of the datastore to workspace
container_name="datasets" # Name of Azure blob container
account_name="ACCOUNT_NAME" # Storage account name
account_key="STORAGE_ACCOUNT_KEY" # Storage account access key

blob_datastore = Datastore.register_azure_blob_container(workspace=ws,
                                                         datastore_name=blob_datastore_name,
                                                         container_name=container_name,
                                                         account_name=account_name,
                                                         account_key=account_key)

# create datastore path and dataset
datastore_paths = [(blob_datastore, 'flower_photos')]
flower_dataset = Dataset.File.from_files(path=datastore_paths)

# register dataset for workspace
flower_ds = flower_dataset.register(workspace=ws,name="flowers_ds", description="Flowers image classification dataset", create_new_version=True)
Now we can use it using mount or can download it. View details on Azure ML documentation to use different datasets for Machine learning.
https://docs.microsoft.com/en-us/azure/machine-learning/how-to-train-with-datasets
Train Model
To train model, we need to have a training script that reads images and train a deep learning model. We will be using mostly training code from our previous blog post on Train Image Classification Model Using Tensorflow.
Mount Dataset
In our training script, we need to access dataset so that we can use it. Azure offers access to workspace data using azureml library. So, we can either download dataset in our script first or can mount it and use only what we need. For this tutorial, we are using mount option to mount dataset.
from azureml.core import Run
from azureml.core import Dataset
import tempfile

run = Run.get_context()
ws = run.experiment.workspace

datasets = Dataset.get_all(ws)
dataset = datasets['flowers_ds']

mounted_path = tempfile.mkdtemp()
# mount dataset onto the mounted_path of a Linux-based compute
mount_context = dataset.mount(mounted_path)
mount_context.start()
Now we can view all our image directories in tempfile directory.
Create Training Code
Now we need to create a deep learning model and train using that dataset. We will not discuss basics of model as you can read them from previous post, but we will discuss some of the azureml methods that we will be using.
import tensorflow as tf

from tensorflow import keras
from tensorflow.keras import layers
from tensorflow.keras.models import Sequential

from tensorflow.keras.layers import Conv2D, MaxPooling2D
from tensorflow.keras.layers import Activation, Dropout, Flatten, Dense
batch_size = 32 # input batch size
img_size = (180, 180) # height x width


# read training dataset
train_ds = tf.keras.preprocessing.image_dataset_from_directory(
    mounted_path, # directory path
    validation_split=0.2, # we use 80% data for training
    subset="training",
    seed=123,
    image_size=(img_size[0], img_size[1]), # image height and width
    batch_size=batch_size # batch size
)

val_ds = tf.keras.preprocessing.image_dataset_from_directory(
    mounted_path,
    validation_split=0.15,
    subset="validation",
    seed=123,
    image_size=(img_size[0], img_size[1]),
    batch_size=batch_size
)

# keras preprocessing normalization
normalization_layer = layers.experimental.preprocessing.Rescaling(1./255)

# Normalize dataset
normalized_ds = train_ds.map(lambda x, y: (normalization_layer(x), y))
image_batch, labels_batch = next(iter(normalized_ds))


model = Sequential()
model.add(layers.experimental.preprocessing.Rescaling(1./255, input_shape=(img_size[0], img_size[1], 3)))
model.add(Conv2D(32, (3, 3), activation="relu"))
model.add(MaxPooling2D())

model.add(Conv2D(64, (3, 3), activation='relu'))
model.add(MaxPooling2D())

model.add(Conv2D(128, (3, 3), activation='relu'))
model.add(MaxPooling2D())

model.add(Flatten())  # this converts our 3D feature maps to 1D feature vectors
model.add(Dense(256, activation="relu"))
model.add(Dense(5))

model.compile(
    optimizer='adam',
    loss=tf.keras.losses.SparseCategoricalCrossentropy(from_logits=True),
    metrics=['accuracy']
)
Now we write custom call back for writing logs. We will write logs to azureml logs, so that we can view data. As we will need training accuracy and loss matrics as well as for validation data, so we will log that data on each epoch end. Logging also provide us a feature to view that data in metrics or tables. So, we write a custom callback and log data.
class CustomCallback(keras.callbacks.Callback):
    def on_epoch_end(self, epoch, logs=None):
        for key, value in logs.items():
            run.log(key, value)
We will train model for only 12 epochs and will save model.
epochs=12
history = model.fit(
    train_ds, # training dataset
    validation_data=val_ds, #testing dataset
    epochs=epochs, #no of epochs
    callbacks = [CustomCallback()]
)
model_save_path = "outputs/final.h5"
model.save(model_save_path)
If we want to access model and use it for inference, we need to register model to azure so that we can use it later. So, we run register model method to save model and class names.
run.upload_file(model_save_path, model_save_path)
model = run.register_model(model_name='keras_flower',
                          tags={'area': 'flowers'},
                          model_path=model_save_path)

labels_path = "outputs/labels.json"
with open(labels_path, "w") as file:
    json.dump(train_ds.class_names, file)

run.upload_file(labels_path, labels_path)
As last step for training, we need to configure our conda environment for training file. We will define all the libraries required that we will be using in our training scripts and python version.
name: tensorflow-env
channels:
    - defaults
    - tensorflow
dependencies:
    - python=3.7.5
    - tensorflow
    - pip<20.3
    - pip:
        - azureml-sdk
        - azureml-dataprep
        - pillow
We can start training now.
Submit Training
In AzureML, we define training as experiment and a experiment can further have runs(Training 1 time will be considered a run for that experiment). So, we define our code directory in local and python file that will be executed on training initiate in cloud. We also specify conda environment file path and submit experiment.
from azureml.core import Workspace, Experiment, Environment, ScriptRunConfig

experiment = Experiment(workspace=ws, name='classification-experiment-1')

config = ScriptRunConfig(source_directory='src', script='train.py', compute_target='cpu-cluster')

# set up pytorch environment
env = Environment.from_conda_specification(name='tensorflow-env', file_path='.azureml/tensorflow-env.yml')
config.run_config.environment = env

# submit experiment
run = experiment.submit(config)
Once we have submitted experiment for training, we can get insights for training of that model. We can get url to AzureML studio for that specific training run and can view all logs for script build and training logs in AzureML Studio.
aml_url = run.get_portal_url()
print(aml_url)
We can check training status using this run details and can apply any checks based on that.
Analyze Training Stats
We can get details of run using status and it will show if it is staging, running, completed or failed. Based on that we can apply further operations. Here are some of the methods we can use to get run details.
# Get string status
run.status

# Get detailed status
run.get_detailed_status()
It also provides a method to get complete run details with complete logs in dictionary format. It provides status. start time, run details and complete logs.
run.get_details_with_logs()Or alternatively if you download log to files directly, we can use get_all_logs() method.
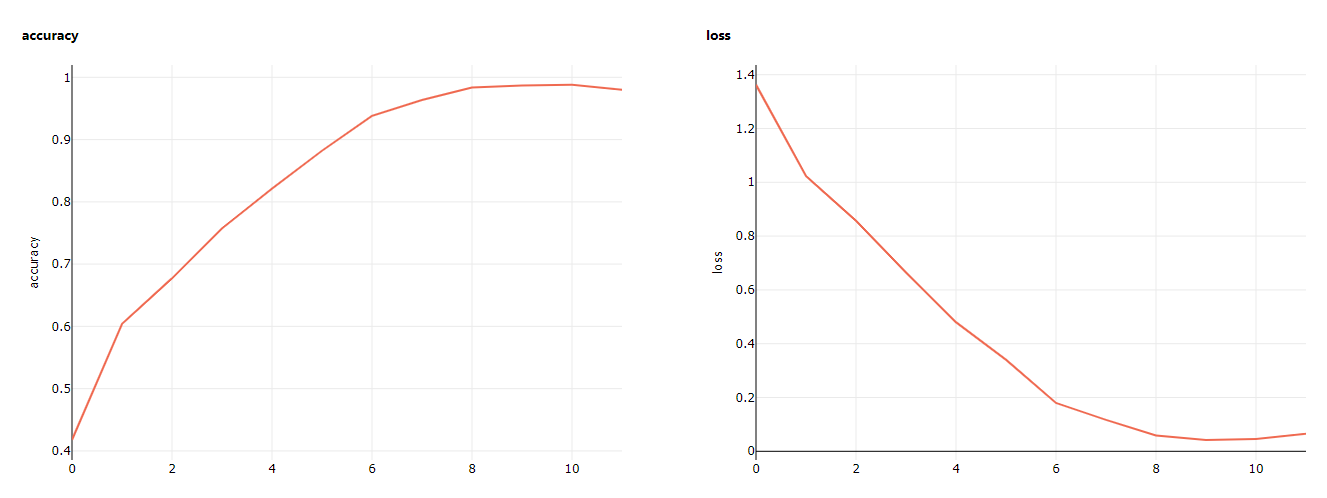
run.get_all_logs()In upper steps, we mentioned of saving training metrics for each epoch. We can view this data on AML Studio or we can fetch these details using get_metrics() method for specified run. It will return all data that we log into AML using key value pairs.
# returns training and validation metrics
run.get_metrics()
We can also get this data from studio. Here are first two graphs for training accuracy and loss.
Now as our model is trained and registered to azure. We can now deploy this model as WebService on AzureML.
Deploy Model
To deploy model on AML, we need to create a python code that will load model and will process the image that we send to web service and return its results. AzureML offers scalable webservice options for deployment of Machine learning models. We can use one of these service for deployment.
- ACI - Azure Container Instance
- AKS - Azure Kubernetes Service
AzureML offers aml_request and response service to send and get data from webservice. If you have a docker image, you can also use that. We will also provide a Environment YML file for python packages that are required for that code. Init function is called on web service initialization and we load our model in this function. Azure provides path to model directory using AZUREML_MODEL_DIR environment variable, we can load model from that path using tf keras load model script.
from azureml.contrib.services.aml_request import AMLRequest, rawhttp
from azureml.contrib.services.aml_response import AMLResponse
from tensorflow import keras
import tensorflow as tf
import numpy as np
import os, json
from PIL import Image
from io import BytesIO
import shutil


def init():
    global model
    weights_path = os.path.join(os.getenv('AZUREML_MODEL_DIR'), "models")
    model = tf.keras.models.load_model(os.path.join(weights_path, 'final.h5'))
Now we write method, that will be called on api request. We can send data by any method like GET or POST, as we are sending image so we will ignore get method and just send a response. In POST method, we gets BytesIO and read image. We need to resize it to (180, 180) to match model input and then we predict that image. As final step, we return response back to user.
@rawhttp
def run(request):
    if request.method == 'GET':
        return AMLResponse("API is Working", 200)
    elif request.method == 'POST':
        reqBody = request.get_data(False)
        myImage = Image.open(BytesIO(reqBody))
        newsize = (180, 180)
        im1 = myImage.resize(newsize)
        im1 = np.asarray(im1)

        # make prediction
        res = model.predict(im1.reshape(1, 180, 180, 3))

        # List of Predictions
        return res.tolist()
    else:
        return AMLResponse("bad request", 500)
We also define environment file with packages that will be required for inference script. We are using python 3.7 but you can also use latest version available and tensorflow latest version. We will use pillow to read and process image that we send during api call.
name: tensorflow-env
channels:
    - defaults
    - tensorflow
dependencies:
    - python=3.7.5
    - tensorflow
    - pip
    - pip:
        - azureml-sdk
        - gunicorn
        - azureml-defaults
        - pillow
Now we create deployment configuration for our web service. We need to define the configuration of ACI(Azure Container Service) for cpu cores and memory in gb, that we will require to load our model and inference for requests. We also define conda specification which include python and pip packages details and an inference script path.
from azureml.core.webservice import AciWebservice, Webservice
from azureml.core.model import InferenceConfig

deployment_config = AciWebservice.deploy_configuration(cpu_cores = 2, memory_gb = 4)

env = Environment.from_conda_specification(name='tensorflow-dep-env', file_path='infer/tensorflow-dep-env.yml')
inference_config = InferenceConfig(entry_script="infer/inference.py", environment=env)
We have registered model using AzureML service, so now we can fetch this model or can deploy it. For deployment, we need to provide model, inference config and deployment config. Model can be fetched by list models method, we can select our specified model by name. Once we are all set, we can deploy model to webservice and wait for deployment as it takes a little time depending on the no of packages it needs to install.
from azureml.core import Model

# Get all models
models = Model.list(workspace=ws)

# If you have multiple model, we can select our model by name
model = [model for model in models if model.name == "keras_flower"][0]

# Deploy of ACI
service = Model.deploy(ws, "infer_flower", [model], inference_config, deployment_config)
service.wait_for_deployment(show_output = True)

# Check webservice state
print(service.state)
Alternatively, if you have already create a service and just want to update it using latest model or inference code, we can select service from services and update it using update() method. After deployment is complete, we can check inference url using service.scoring_uri. Which we now will use to send api request using image file and it will respond with list of predictions.
You can get more details about AzureML from official documentation.