Google Cloud offers different services to train and deploy machine learning algorithms on cloud. In this tutorial, we will deploy an Object Detection model using flask as a web service on Google Cloud Run using Docker. We will also work with continuous deployment using github to easily deploy models with just git push. In this tutorial, we will also work to store models on gcloud storage and load models from there. So, here are list of steps we will be performing to make all this work and create a live web service.
- Create a Basic Flask Web App
- Perform Inference using Models
- Setup Gcloud bucket and Load models
- Deploy on GCloud Run
- Setup Continuous Deployment with Github
So, let start creating a flask application.
1. Flask Application
Flask is a very popular framework for development of web applications and apis for Deep Learning models. So, first we create a basic flask server with single page to upload files to server. For installation, use pip to install flask on your system.
pip install flaskNow we create a flask web server. Create a python file main.py in a directory and create app. For this, we are creating two initial routes.
- Index page to show html page
- Upload route to upload images for inference
# import required modules
from flask import Flask, render_template, request

# create flask app
app = Flask(__name__)

# main route (show html page)
@app.route('/')
def index():
    return render_template('index.html')

# api endpoint for image upload
@app.route('/api/upload', methods=['POST'])
def upload():
    # receive the file from the client
    file = request.files['file']
    filepath = f'static/temp/{file.filename}'
    file.save(filepath) # save to directory

    # return server url to client
    return f"{request.url_root}{filepath}"

# Run flask server
if __name__ == '__main__':
    app.run(debug=True) # set debug true to load reload server auto on changes
Now, we need to define an HTML page for templates defined in index route. We can create a directory named templates inside current folder and create index.html inside this directory. We are using bootstrap for designing and some custom css code is inside a css file. For requests and basic image handling, we are using javascript with jquery.
<!DOCTYPE html>
<html lang="en">

<head>
    <meta charset="UTF-8">
    <meta http-equiv="X-UA-Compatible" content="IE=edge">
    <meta name="viewport" content="width=device-width, initial-scale=1.0">
    <title>Home</title>
    <!-- Latest compiled and minified CSS -->
    <link rel="stylesheet" href="https://maxcdn.bootstrapcdn.com/bootstrap/3.3.7/css/bootstrap.min.css" crossorigin="anonymous">
    <link rel="stylesheet" href="{{ url_for('static', filename='css/styles.css') }}" />

</head>
<body>
<div class="container main-container">
    <div class="row">
        <div class="col-md-10 form-group">
            <label for="fileInput">File input</label>
            <input type="file" class="form-control" onchange="loadImg()" id="fileInput" aria-describedby="fileHelp">
        </div>
        <div class="col-md-2 btn-submit-container">
        <button type="button" class="btn btn-primary" id="upload">Process Image</button>
    </div>
    </div>
    <div>
        <img src="" id="imagePreview" class="image-preview">
    </div>
</div>
</body>
<script src="https://code.jquery.com/jquery-3.6.0.min.js" integrity="sha256-/xUj+3OJU5yExlq6GSYGSHk7tPXikynS7ogEvDej/m4=" crossorigin="anonymous"></script>
<script src="{{ url_for('static', filename='js/utils.js') }}">
</script>
</html>
For static files created above, we can create another folder named static to server our static files, where we create static/css/styles.css and static/js/utils.js files.
Fore styles.css
.main-container{
    padding-top: 50px;
}
.btn-submit-container{
    padding-top: 25px
}
.image-preview{
    max-width: 85%;
}
And for file preview and upload, we use ajax using jquery to upload files to api.
For utils.js
function loadImg(){
    // Show preview image for select file before upload
    $('#imagePreview').attr('src', URL.createObjectURL(event.target.files[0]));
}

// Upload image using ajax
$('#upload').click(function(){
    // Create form data
    var formData = new FormData();
    // add file to form data
    formData.append('file', $('#fileInput')[0].files[0]);
    $.ajax({
        url: '/api/upload', // API Endpoint
        type: 'POST', // Request type
        data: formData, // Request data
        contentType: false,
        processData: false,
        success: function(data){
            // On request succss, we show image from server
            $('#imagePreview').attr('src', data);
        }
    });
});
After creating all these files, we can run server and test current workflow of api. To run flask server open command prompt and run this command.
python main.pyIt will start server on localhost with port 5000 by default. Go tohttp://localhost:5000 in any browser and go to this url to view application.
Inference using Tensorflow
Next, we create script to load Deep Learning models and perform inference. For this tutorial, we are using Tensorflow and will use pretrained models from tensorflow model zoo which is trained on 90 classes and different models are avialable based on speed and accuracy. For more information on this, view this post.
https://mlhive.com/2022/01/object-detection-using-pretrained-models-from-tensorflow-detection-zoo
First we need to write script to fetch models, so for this tutorial we are using Tensorflow model zoo and fetch models from their repository and perform inference. Create a file named utils to fetch any model, unzip it and provide full qualified path to load model using tensorflow. For fetching model from repository and unzip it, we are using python package gdown.
Filepath: src/utils.py
import os, gdown

base_url = "http://download.tensorflow.org/models/object_detection/tf2/20200711/"

def download_model(model_name):
    """ Download model from TensorFlow.org if not exists extract and return path to model """
    url = f"{base_url}{model_name}" # Model URL
    model_path = f"models/{model_name}" # Model zip path

    model_dir = model_path.replace(".tar.gz", "") # Model directory path

    if not os.path.exists(model_dir):
        # If not exists download model and extract
        gdown.cached_download(url, model_path, postprocess=gdown.extractall)

        # remove the zip file
        os.remove(model_path)

    return os.path.join(model_dir, "saved_model")
Now, we create a script inside a directory which process an image from path and write to file.
Filepath: src/detect.py
import numpy as np
import tensorflow as tf
import cv2
from src.utils import download_model

# Model to Use
model_name = "ssd_mobilenet_v2_fpnlite_640x640_coco17_tpu-8.tar.gz"

# load model from path (it will download from url if not exists locally)
model= tf.saved_model.load(download_model(model_name))

def process_image(image_path):
    # read image and preprocess
    img = cv2.imread(image_path)
    h, w, _ = img.shape
    img = cv2.cvtColor(img, cv2.COLOR_BGR2RGB)
    input_tensor = np.expand_dims(img, 0)

    # predict from model
    resp = model(input_tensor)

    # get the output of the prediction
    # iterate over boxes, class_index and score list
    for boxes, classes, scores in zip(resp['detection_boxes'].numpy(), resp['detection_classes'], resp['detection_scores'].numpy()):
        for box, cls, score in zip(boxes, classes, scores): # iterate over sub values in list
            if score > 0.6: # we are using only detection with confidence of over 0.8
                ymin = int(box[0] * h)
                xmin = int(box[1] * w)
                ymax = int(box[2] * h)
                xmax = int(box[3] * w)

                # draw on image
                cv2.rectangle(img, (xmin, ymin), (xmax, ymax), (128, 0, 128), 4)

    # convert back to bgr and save image
    cv2.imwrite(image_path, cv2.cvtColor(img, cv2.COLOR_RGB2BGR))
This code can be utilized in app upload route and we can process image after upload.
@app.route('/api/upload', methods=['POST'])
def upload():
    ...
    # process image after upload
    process_image(filepath)

    # return server url to client
    return f"{request.url_root}{filepath}"
After this, reload page and upload image to process and response should be image updated with detections drawn on image. Once application is working fine, we can move to next step.
Dockerize Flask App
GCloud offers different options to setup and deploy application on cloud. We will be using GCloud Run and for that we need to dockerize our application. For docker, we need to define all required packages in a requirements file and then we create dockerfile to specify workflow.
In requirements.txt
flask
gunicorn
opencv-python-headless
gdown
Now we define dockerfile and we will be using base tensorflow image from tensorflow repository on docker hub.
FROM tensorflow/tensorflow

# Install production dependencies.
ADD requirements.txt .
RUN pip install -r requirements.txt

# Copy local code to the container image.
WORKDIR /app
COPY . .

# Service must listen to $PORT environment variable.
# This default value facilitates local development.
ENV PORT 8080

# Run the web service on container startup. Here we use the gunicorn
# webserver, with one worker process and 8 threads.
# For environments with multiple CPU cores, increase the number of workers
# to be equal to the cores available.
CMD exec gunicorn --bind 0.0.0.0:$PORT --workers 1 --threads 8 --timeout 0 main:app
Now we can build docker image using docker. Open command prompt in project root directory and write following command.
Change tensorflow-api to any other name, if you want.
docker build -t tensorflow-api .Once docker image is ready, we can test locally to verify is application is working fine inside docker by create a docker container using this image.
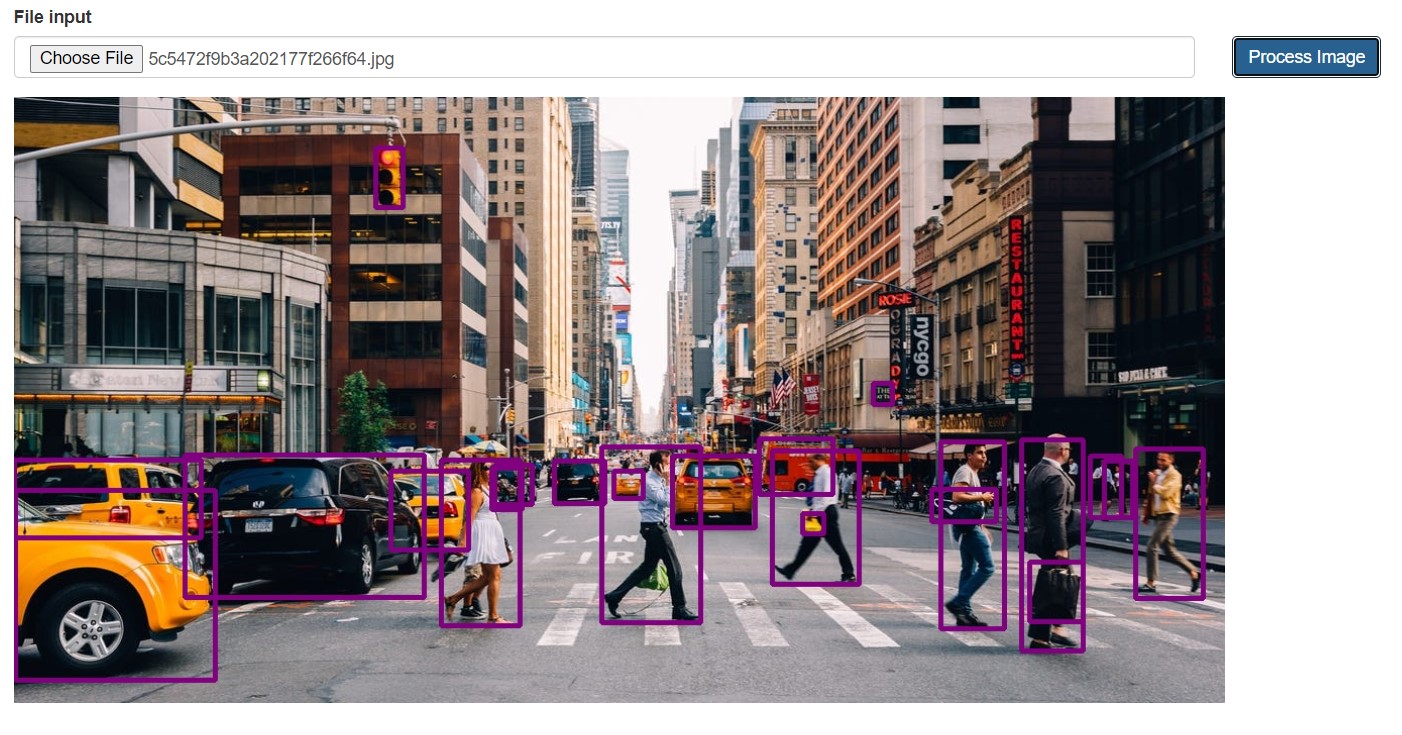
docker run -p 8080:8080 tensorflow-apiOnce container is running, navigate to http://localhost:8080 in your browser and it should work. Here is a sample image tested in application.
Deploy on Google Cloud
After testing application, this can be deployed on any cloud service you want easily using Docker. For this example, we will deploy this application on google cloud. Google cloud has different options to deploy and we will use GCloud Run service for deployment. There are also options to deploy using either gcloud command line tool, github or other services.
Deploy using GCloud CLI
First, we deploy using Google Cloud CLI. First setup a project on google cloud console and install google cloud cli tools using this url on your OS.
https://cloud.google.com/sdk/docs/install
Ater setting up google cloud sdk, you can login to gcloud sdk and select your project. For example.
# login to google account
gcloud auth login

# select project
gcloud config set project PROJECT_ID
Once you have setup project, then you can build docker image using gcloud and store on google container registery.
# replace PROJECT_ID with your project id and image name if your want

gcloud builds submit --tag gcr.io/PROJECT_ID/tensorflow-api
After completion, we can create a cloud run service by visiting to this url.
https://console.cloud.google.com/run/create
Now we can select a docker container from docker image in google container registery or we can setup build from github. For this step we select docker image we created above. Click on select in Container Image URL button and select your required image.

After select, there are other configurations that you can modify.
- Service Name - Name of cloud run service
- Region - Select any suitable region
- CPU Allocation - Whether to always allocate CPU or only on request and you are charged accordingly.
- Autoscalling - Max and Min number of instance you want to manage traffic
And then there are other configurations related to request managment as only to cloud services or all and authentication. In advanced settings, you can setup CPU, RAM, ports and other details. For this example, we setup 2 CPU and 4GB of RAM. Once done with configurations, we can create service. Once deployment is complete, navigate to given url and you can test service.
For github, view continuous deployment section.
Setup Continuous Deployment
Continuous deployment is when we use some trigger to autmatically deploy changes to application. We will use github to setup continuous deployment for application so once we make changes to app and push to github, it will be automatically deployed.
First create a repository on github and push your code to that repository so that can be used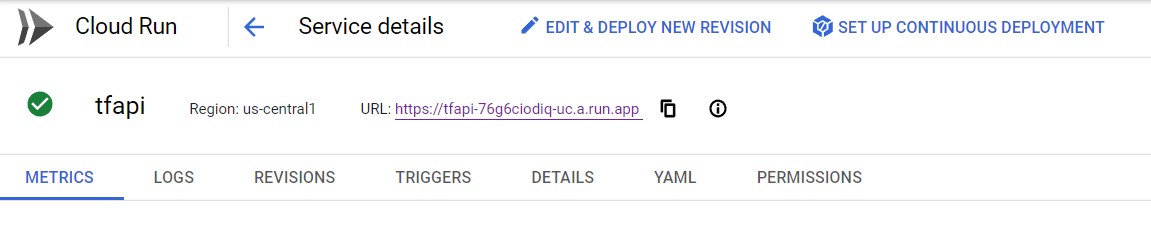 for continuous deployment.
Open service on gcloud run and cloud on Setup Continuous Deployment on top and it will open sidebar to setup continuous deployment. Here you can select different options like Github, Bitbucket and Cloud resources. For github, you will need to login using github and then it will display all repositories.
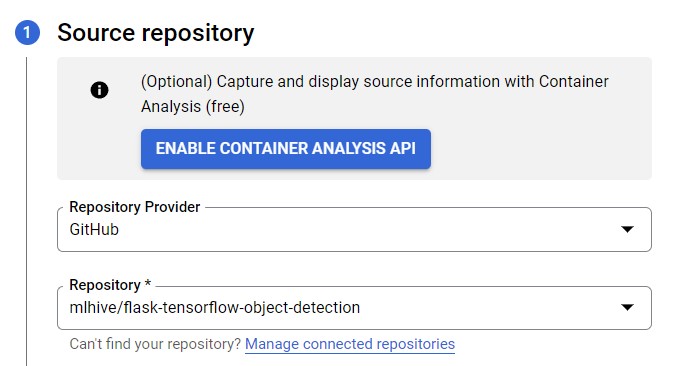
Select your repository and click on Next button. In next tab, select branch name that on change will trigger build and build type which in our case is dockerfile. Select dockerfile location which in this case is default.
Now you can click build to create a build and it will deploy latest code on github to gcloud service. Now it will trigger every time you push changes to main branch. All configurations related to build can be changed in build section.
https://console.cloud.google.com/cloud-build/triggers
For more information related to gcloud run, visit gcloud documentation.